How to Clean Wood Floors Without Damaging Finish
You can clean wood floors without harming the finish by removing grit first, then using a damp microfiber mop and a pH‑neutral cleaner or a mild DIY mix (dilute vinegar or castile soap sparingly). Work with the grain, use minimal water, dry each section, and avoid steam, ammonia, or abrasive tools. Protect high‑traffic zones with mats and felt pads, monitor humidity, and spot‑test products; follow these steps and you’ll find simple maintenance and repair tips if you want more.
Quick Routine to Clean Wood Floors Safely

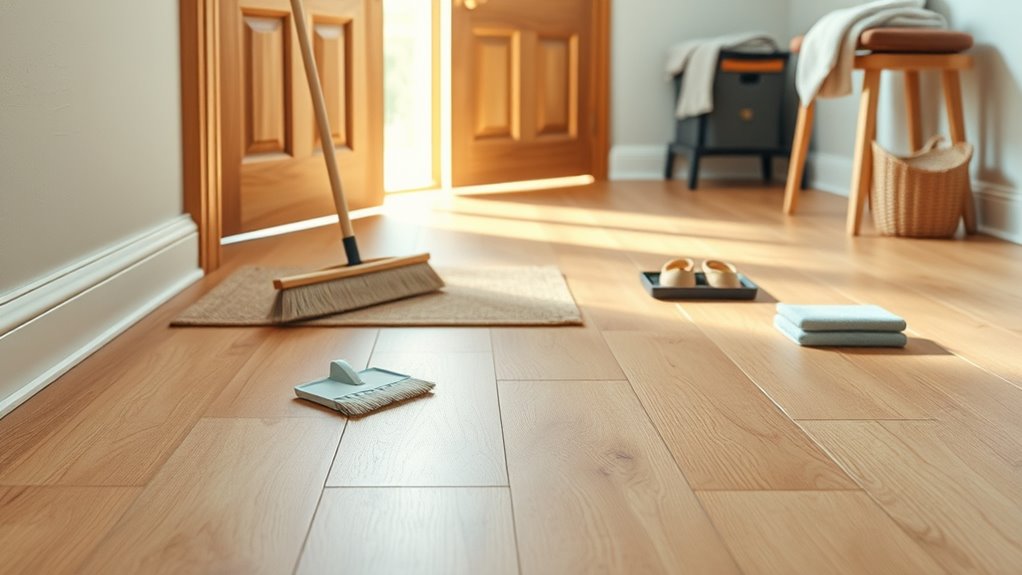
Before you start, sweep or dry-mop the floor to remove grit that can scratch the finish. Then work from the farthest corner toward the exit so you’re not stepping on freshly cleaned wood.
Start by sweeping or dry-mopping to remove grit, then clean from the farthest corner toward the exit.
Next, choose a damp—not wet—microfiber mop and a pH-neutral wood cleaner diluted per label directions. Spray sparingly or wring the mop thoroughly to avoid pooling.
Clean small sections, rubbing with the grain for stubborn spots, and rinse the mop frequently. Dry each section immediately with a clean cloth or dry mop to prevent water damage.
Finish by replacing rugs and felt pads to protect traffic areas.
Identify Your Floor Type and Finish
Now that you’ve got a safe routine down, take a moment to identify what kind of wood floor you’re working with—solid hardwood, engineered wood, or a surface with a specific finish—because cleaning methods vary.
You’ll inspect edges, plank thickness, and any wear layers. Look for stamped labels or ask your installer if unsure. Knowing substrate and finish helps you pick cleaners and tools that won’t harm layers or void warranties.
- Check plank thickness for solid vs. engineered.
- Inspect edges and ends for laminates.
- Look for manufacturer labels or invoices.
- Note glossy vs. matte appearance for care choices.
Which Finishes Need Special Care (Polyurethane, Wax, Oil)
If your floor has a polyurethane finish, you’ll want to avoid harsh cleaners and use a pH-neutral mop solution to protect the film.
For waxed floors, plan for gentle cleaning and periodic re-waxing to maintain the protective layer.
Oiled floors need regular light cleaning and occasional re-oiling to replenish the finish and prevent drying.
Polyurethane Care Tips
Because polyurethane sits on the surface to protect wood, it needs different maintenance than waxed or oiled finishes, and you’ll want to treat each accordingly. You should clean gently, avoid harsh chemicals, and protect the film from abrasion.
- Use a soft broom or microfiber mop to remove grit that can scratch the finish.
- Damp-mop with a pH-neutral cleaner, wringing the cloth until barely damp to prevent water damage.
- Wipe spills promptly; long contact can stain or dull the topcoat.
- Use felt pads under furniture and area rugs in high-traffic zones to preserve the polyurethane layer.
Waxed And Oiled Floors
While polyurethane forms a hard surface film, waxed and oiled floors soak care into the wood itself, so you’ll need different cleaning and maintenance habits for each finish. You should dust and sweep often, use a damp — not wet — mop, and avoid alkaline cleaners that strip oil or wax. Reapply wax or oil periodically to restore protection and sheen. Spot-treat spills immediately to prevent staining.
| Finish | Care |
|---|---|
| Wax | Dry dust, paste wax renewal |
| Oil | Damp mop, re-oil as directed |
| Both | Avoid harsh detergents |
Engineered vs. Solid Hardwood: Care That Differs
When you’re deciding how to clean and maintain hardwood floors, know that engineered and solid planks need different approaches due to their construction and finish.
You’ll treat engineered floors more like a sealed surface: avoid excessive water and abrasive cleaners because the thin top layer can’t be refinished many times.
Solid hardwood tolerates gentler sanding and refinishing, so you can address deeper wear later.
For both, use pH-neutral cleaners and quick drying methods.
Choose products recommended by the manufacturer and test small areas first.
- Water: minimal, wipe spills fast
- Cleaner: pH-neutral only
- Pads: soft, nonabrasive
- Refinish: solid yes, engineered limited
Best Daily Habits to Keep Wood Floors Dirt-Free
If you want your wood floors to stay dirt-free, make simple daily habits part of your routine. Remove shoes at the door to cut tracked-in grit, and place rugs or mats at entrances to catch moisture and debris.
Wipe spills immediately with a soft, dry cloth to prevent sticky residues. Keep pet nails trimmed and furniture glides in place to reduce scuffs.
Empty vacuum or dustpan daily so tools work effectively. Ventilate to avoid damp build-up that attracts dirt.
A brief nightly walk-through takes minutes and prevents buildup, protecting your finish and saving time later.
How to Sweep and Dust Without Scratching
To protect your finish, use a soft-bristle broom for coarse dirt and a microfiber dust mop for daily pickup.
Move the broom or mop gently along the grain to avoid dragging grit that can scratch.
Shake or wash the microfiber head regularly so it traps particles instead of rubbing them across the floor.
Use Soft-Bristle Broom
Though it’s tempting to grab any broom, choose a soft-bristle one so you won’t scratch the finish while sweeping up dust and grit. You’ll protect the wood by using gentle strokes, working with the grain, and keeping bristles clean.
Sweep regularly to prevent abrasive buildup and check the broom for trapped debris before use. Angle the broom lightly to lift particles rather than push them across the surface.
- Choose soft, non-abrasive bristles.
- Sweep with the grain using light pressure.
- Inspect and clean bristles after each session.
- Replace broom when bristles splay or harden.
Microfiber Dust Mop
After you’ve swept away larger grit with a soft-bristle broom, grab a microfiber dust mop to pick up the fine particles that scratching dust can leave behind. Glide it slowly, overlapping strokes so fibers trap dust instead of scattering it.
Use a flat-head mop with a washable microfiber pad and launder according to manufacturer instructions—no fabric softener. Change or shake the pad outside when it’s loaded; don’t sweep dust into corners with a dry broom afterward.
For daily maintenance, a quick pass prevents grit buildup.
For textured or uneven boards, use a microfiber mitt and gentle wrist motions to avoid abrasion.
How to Vacuum Wood Floors Without Damage
Because vacuuming wrong can scratch or dull your finish, you’ll want to choose tools and techniques that protect the wood while removing grit. Use a vacuum with a soft-brush or hardwood setting; avoid beater bars and stiff bristles.
Vacuum carefully with a soft-brush or hardwood setting—avoid beater bars to prevent scratching or dulling the finish.
Vacuum along the grain and in low-suction mode to lift debris without dragging particles. Empty the canister or change the bag frequently to prevent reintroducing grit. Check wheels and attachments for trapped stones before each use.
- Select a hardwood-safe vacuum.
- Disable rotating brushes.
- Vacuum slowly along the grain.
- Maintain the vacuum to prevent scratches.
Best Pads and Mops for Scratch-Free Cleaning
When you want scratch-free cleaning, pick microfiber or cotton blend pads that trap grit instead of dragging it across the finish. Attach low-profile, soft pads to flat mops or velcro heads to avoid edges catching.
Choose pads labeled nonabrasive and rinse or replace them when they look gritty.
For handheld spills, use a plush microfiber cloth rather than a scrub brush. Avoid metal scrubbers, abrasive scouring pads, and stiff-bristled brushes.
If you use a spray mop, make certain its pad is machine-washable and free of fabric softener residue. Replace pads regularly to prevent trapped debris from scratching your wood.
How to Mop Wood Floors the Right Way
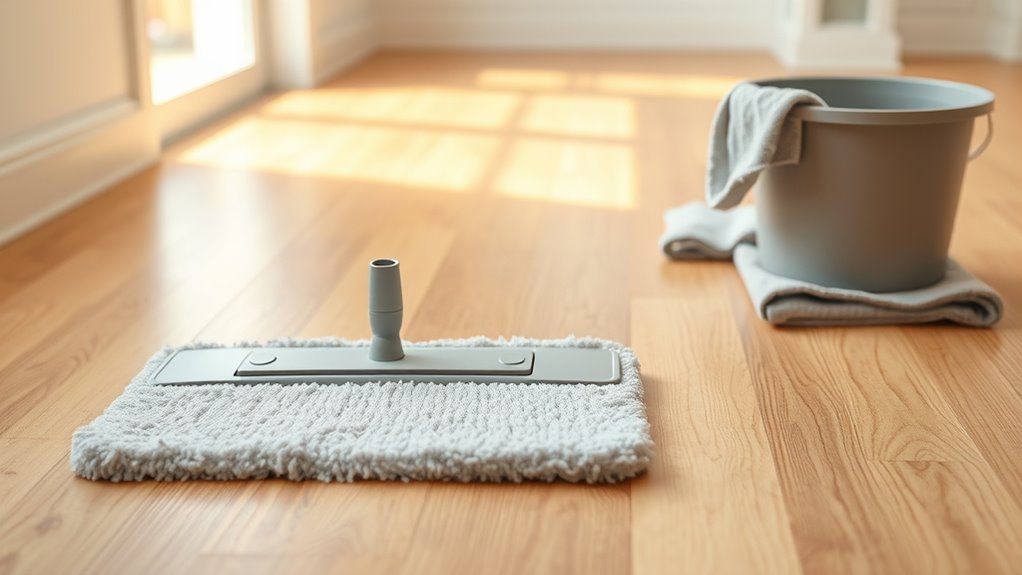
Although a mop might seem simple, using the right technique keeps your wood finish intact and extends its life. You’ll start by sweeping or vacuuming to remove grit that scratches.
Wring the mop so it’s damp, not wet; excess water warps boards and dulls finish. Mop with the grain using smooth, overlapping strokes, and rinse the mop head often to avoid redepositing dirt.
Dry any damp areas quickly with a clean microfiber cloth or towel to prevent water spots.
- Sweep thoroughly first
- Use a well-wrung mop
- Mop with the grain
- Dry promptly
Safe Cleaning Solutions for Wood Floors
Keeping your mop technique sharp is only part of the job — choosing the right cleaner matters just as much. You should use pH-neutral, nonabrasive products labeled safe for hardwood or engineered floors.
Avoid wax-based, oil soaps, or ammonia cleaners—they can dull or strip finishes. For spot cleaning, use products designed for your floor’s finish (polyurethane, water-based, etc.).
Always dilute concentrated solutions per directions and test in an inconspicuous area first. Use minimal moisture and a well-wrung mop.
Store cleaners securely and discard expired products. When in doubt, consult the floor manufacturer’s care recommendations to protect the finish.
Homemade Cleaners That Won’t Harm Finishes
If you prefer DIY solutions, you can make gentle, finish-safe cleaners with a few common household ingredients that won’t harm polyurethane or water-based finishes. Mix mild, pH-neutral solutions and always test a hidden spot first. Use minimal liquid and a damp microfiber mop to avoid saturation. Rinse residue with clean water and dry quickly.
Prefer DIY? Use mild, pH-neutral homemade cleaners, damp microfiber mops, and quick drying—test first on a hidden spot.
- 1 cup warm water + 1/2 tsp castile soap — light degreaser, gentle.
- 1 gallon warm water + 1/4 cup white vinegar — for dulling buildup only, dilute well.
- 1 cup warm water + 1 tsp mild dish soap — everyday cleaning.
- Rubbing alcohol 1:4 with water — spot-clean sticky residue.
Commercial Wood-Floor Cleaners Worth Using
When you choose a commercial cleaner, look for pH-balanced formulas that won’t strip finishes.
Check ingredient lists to make sure they’re labeled finish-compatible for your floor type.
Decide whether a concentrated product (which saves money and waste) or a ready-mix (more convenient) fits your routine.
pH-Balanced Formulas
Because wood finishes can be sensitive to harsh cleaners, you want a pH-balanced formula that gently removes dirt without stripping or dulling the surface. Choose cleaners labeled pH-neutral or specifically for wood; they preserve sheen and finish integrity.
Test any product in an inconspicuous spot, follow dilution instructions, and avoid over-wetting.
Look for biodegradable, low-residue options that won’t build up over time. Regular light cleaning keeps grit from abrading the finish so you won’t need stronger chemicals.
- pH-neutral label and wood-safe claim
- Clear dilution directions
- Low-residue, biodegradable formula
- Test spot results first
Finish-Compatible Ingredients
Though formulas vary, look for commercial cleaners that list finish-compatible ingredients like mild surfactants, water-soluble solvents, and pH-stabilizers so you don’t harm polyurethane, oil, or wax finishes. You’ll want cleaners labeled safe for sealed wood, solvent-free or low-solvent, and pH-neutral. Test in an inconspicuous spot, follow dilution and dwell-time directions, and avoid products with ammonia, bleach, or abrasive additives. Choose reputable brands with clear ingredient lists and finish-specific recommendations to reduce risk. Replace residue-prone sprays with rinsing formulations when possible.
| Ingredient type | Why it’s good |
|---|---|
| Mild surfactants | Lift soil gently |
| Water-soluble solvents | Evaporate cleanly |
| pH-stabilizers | Protect finish |
| Non-abrasive bases | Preserve sheen |
Concentrate Versus Ready-Mix
Curious which option saves you time and money: concentrates you dilute yourself or ready-mix cleaners you spray straight from the bottle? You’ll weigh convenience, cost, storage, and control.
Concentrates cut per-use cost and let you adjust strength for sealed wood, but you’ll measure and mix.
Ready-mix is grab-and-go, reduces dosing errors, and usually comes in user-friendly sprays that protect finishes without fuss.
- Concentrate: lower long-term cost, adjustable strength.
- Ready-mix: instant use, consistent formula, minimal risk.
- Storage: concentrates save space; ready-mix needs more shelf room.
- Waste: concentrates reduce packaging waste.
What Cleaners and Tools to Avoid (And Why)
When you’re cleaning wood floors, steer clear of harsh chemicals and abrasive tools that can dull the finish, strip the sealant, or scratch the surface; these include straight ammonia, bleach, oil-based soaps, steam cleaners, steel wool, and rough brushes.
Avoid harsh chemicals and abrasive tools that dull finishes, strip sealant, or scratch wood floors.
Avoid vinegar concentrates or undiluted solvents—they etch finishes and remove protective coatings.
Don’t use wax-based cleaners on polyurethane floors; they leave residue and attract grit.
Skip dish soaps not formulated for wood; they can leave film.
Also don’t drag heavy furniture without pads or use gritty scrubbing pads.
Choose pH-neutral, wood-specific products and soft microfiber tools instead.
How to Spot-Test Cleaners and Materials Safely
Before applying any cleaner widely, test it in an inconspicuous spot so you can see how the finish reacts without risking visible damage. Dampen a white cloth with the cleaner, blot a 1-inch area, and wait five minutes. Look for discoloration, dulling, lifting, or residue. Repeat with other materials (microfiber, mop solution) and note outcomes.
- Use a white cloth to avoid hidden dyes.
- Test near a baseboard or closet corner.
- Record results and time waited.
- Rinse the test area with water if unsure.
If any change appears, don’t use that product on your floor.
How to Treat Spills Quickly to Prevent Stains
How quickly you act makes the difference. When a spill happens, blot immediately with a soft, lint-free cloth—don’t rub. Lift liquids from the grain, working outward to avoid spreading.
For water, dry the area thoroughly to prevent cupping or discoloration.
For colored liquids, gently dab with a damp cloth, then dry; if stain persists, test a mild wood floor cleaner in an inconspicuous spot first.
For oily spills, sprinkle a little baking soda to absorb, wait a few minutes, then sweep and wipe.
Always finish by drying completely and checking the finish for any change.
Remove Sticky Residue Without Stripping the Finish
If sticky spots from tape, spills, or adhesive build up, don’t reach for harsh solvents that can dull the finish—you can remove residue safely with gentle methods.
Start by softening residue with a damp microfiber cloth warmed by a bit of water; let it sit to loosen tackiness.
For stubborn bits, apply a small amount of mineral oil or a commercial adhesive remover labeled safe for finished wood, test in an inconspicuous spot first, then wipe away gently.
Avoid scrubbing abrasively or using acetone.
- Soften with damp microfiber
- Test cleaners in hidden area
- Use mineral oil sparingly
- Wipe, don’t rub aggressively
Lift Scuff Marks on Wood Floors Safely
When scuffs mar your wood floor, you can often lift them without damaging the finish by using gentle, non-abrasive methods; start with the least invasive option and work carefully. Test in an inconspicuous spot first.
| Tool | Action |
|---|---|
| White eraser | Rub gently to lift marks |
| Soft cloth + oil | Dab small amount, wipe excess |
| Baking soda paste | Lightly buff, then rinse |
If marks persist, try a commercial wood cleaner designed for finishes. Avoid steel wool, harsh abrasives, or strong solvents. Finish with a dry microfiber wipe to remove residue and restore sheen.
Remove Surface Scratches and When to Refinish
Check the scratch to see if it’s only in the finish or has cut into the wood. Shallow marks can usually be fixed at home, while deeper ones may need more work.
Try simple DIY repairs like blending with a stain marker or lightly sanding and reapplying finish for minor damage.
If scratches are widespread, the finish is worn through, or boards are gouged, it’s time to think about refinishing the floor.
Assess Scratch Depth
Before you reach for a repair kit, take a close look to determine how deep the scratches are — light, superficial scratches only affect the finish and can usually be buffed or filled, while deeper gouges that cut into the wood itself will need more extensive repair or refinishing.
You should inspect in good light, run your fingertip across each mark, and use a magnifier if needed. Note finish type and location; traffic areas matter. Decide if the floor’s overall wear justifies refinishing.
Then choose an approach that matches scratch depth and long‑term maintenance goals.
- Light: only finish damaged
- Shallow: into veneer/stain
- Deep: into hardwood fibers
- Widespread: consider refinishing
DIY Scratch Repairs
If you’ve confirmed scratches only affect the finish, you can often fix them yourself with a few simple steps and common supplies.
Clean the area with a damp, lint-free cloth and mild cleaner, then let it dry.
For light surface marks, rub a wax stick or matching wood marker into the scratch, wipe excess, and buff gently with a soft cloth.
For slightly deeper scratches, apply a thin coat of finish-compatible wood filler or blended paste, smooth with a plastic scraper, and let cure before buffing.
Test products in an inconspicuous spot first to guarantee color and sheen match.
Signs You Should Refinish
Once you’ve tried spot repairs and the scratches keep catching the light or feel rough underfoot, it’s time to decide whether a full refinish is necessary. You’ll look for widespread dullness, deep gouges that don’t blend with fillers, finish wearing through to bare wood in high-traffic zones, and recurring damage after cleaning.
If multiple signs appear, refinishing restores protection and uniform appearance. Consider cost and downtime versus continued touch-ups. Prioritize refinish when aesthetics, splinter risk, or moisture exposure rise.
Below are cues that indicate you should refinish now:
- Finish worn to bare wood
- Deep, non-blendable gouges
- Persistent dullness
- Splintering or rough patches
Early Signs of Water Damage and Cupping
When wood flooring starts to cup, you’ll often notice boards that are higher at the edges than in the center and small gaps or raised seams between planks. These are early signs that moisture has penetrated the boards and warped their shape.
You’ll also see uneven reflectivity where light bounces differently off cupped areas and hear a hollow sound when you tap affected boards. Cupping often follows spills, leaks, high humidity, or poor ventilation.
Act quickly: dry the area, locate moisture sources, and improve airflow. Left unchecked, cupping can stress joints and finish, leading to more extensive repairs.
How to Refresh Dull Polyurethane Finishes at Home
Start by giving the floor a light cleaning to remove grit and oils so you don’t abrade the finish.
Apply a restorative product made for polyurethane, following the label and working small sections.
Finish by buffing lightly and adding a protective coat or maintenance spray to keep the sheen.
Light Cleaning First
Although the finish may look tired, you can often revive dull polyurethane with a simple light cleaning that removes surface grime and restores some shine. Start by sweeping or vacuuming with a soft-brush attachment to lift dust.
Mix a few drops of pH-neutral wood cleaner with warm water; dampen a microfiber mop—don’t soak the floor. Work in small sections, rinsing the mop often and drying immediately with a clean cloth to prevent water spots.
Avoid harsh chemicals and abrasive pads that strip finish. Regular, gentle maintenance keeps the surface reflective and delays more intensive restorative steps.
- Sweep first
- Use pH-neutral cleaner
- Damp-mop, then dry
- Avoid abrasives
Apply Restorative Products
If your routine cleaning hasn’t restored the shine, you can use restorative products designed for polyurethane to refill microscopic scratches and revive gloss without sanding.
Choose a water-based polish or restorative finish labeled safe for polyurethane. Test in an inconspicuous spot to confirm compatibility and color match.
Clean thoroughly and let the floor dry before application. Apply sparingly with a microfiber mop or soft cloth, working in thin, even passes along the grain.
Allow the recommended dry time between coats. Avoid silicone or wax-based products that can interfere with future maintenance or refinishing.
Read manufacturer instructions and ventilate the area.
Buff And Protect
Want to bring back that lost shine without sanding? You can refresh a dull polyurethane finish by cleaning, lightly abrading, and protecting the surface.
Start with a gentle cleaner, dry thoroughly, then buff modestly with a blue or white pad—don’t overwork corners. After buffing, apply a thin coat of acrylic floor polish or a maintenance product made for polyurethane; follow drying times and use a microfiber applicator.
Maintain with soft-soled traffic and regular dusting. Consider spot-testing first.
- Clean: remove grit to avoid scratching.
- Light abrade: scuff, don’t sand through.
- Polish: thin, even coats.
- Protect: limit water and wear.
When to Re-Wax Versus When to Refinish
When your finish looks dull or has light scratches, you can usually re-wax the floor to restore shine and protection. You should re-wax when the finish is intact, wear is superficial, and you want a quick, inexpensive refresh.
Clean thoroughly, buff lightly, then apply thin, even coats of paste wax per product directions.
Refinish when finish is worn through, deep scratches, stains, or cupping expose bare wood or sanding is needed to level surfaces. Refinishing removes old finish, repairs damage, and applies durable modern coatings but requires time, dust control, and often professional help.
How Temperature and Humidity Affect Wood Floors : Target Ranges
You should keep indoor temperatures between about 60–80°F to prevent wood from contracting or swelling.
Aim for relative humidity around 30–50% to minimize gaps, cupping, and warping.
Maintaining those target ranges will help your finish last and reduce the need for repairs.
Ideal Temperature Range
Although wood reacts to its surroundings, keeping indoor temperatures fairly steady is the best way to prevent gaps, cupping, and warping in your floors. You should aim for a comfortable range that minimizes seasonal movement and protects finishes.
Avoid extreme swings from heating or cooling systems, and let floors acclimate after major temperature changes. Monitor rooms near exterior doors and heat sources, and adjust vents or insulation to reduce hotspots.
Practical target range:
- Keep indoor temperature between 60°F and 75°F.
- Avoid rapid changes greater than 5°F per day.
- Stabilize temperature before installing new flooring.
- Use zoned controls for problem areas.
Optimal Humidity Levels
1 essential factor for keeping wood floors stable is controlling indoor humidity, since wood absorbs and releases moisture and will expand or contract as relative humidity shifts. Aim for 30–50% RH year-round; narrower 35–45% is ideal for mixed-species floors.
Use a humidifier in dry winter air and a dehumidifier or air conditioner in humid summers to prevent gapping, cupping, or crowding.
Monitor with a reliable hygrometer in main living areas and near exterior walls.
When adjusting humidity, change levels gradually—no more than 5% per day—to let boards acclimate and protect the finish and structural integrity.
Protect High-Traffic Areas and Entryways Effectively
While high-traffic zones take the brunt of daily wear, small preventive steps will keep your wood floors looking newer longer. You can limit dirt, grit, and abrasion at entryways and paths without changing your routine much.
Place durable mats outside and inside doors, use felt pads under furniture and chair legs, and rotate rugs to spread wear. Sweep and vacuum regularly to remove particles that scratch. Check and replace worn floor protectors promptly.
These measures reduce surface damage and preserve finish, so cleaning stays effective and refinishing is delayed.
- Install low-profile, non-slip mats
- Use felt pads and rubber caps
- Rotate and clean rugs often
- Keep grit-free with daily sweeping
When to Call a Pro: Damage Needing Repair or Refinishing
If your floor shows deep scratches, gouges, large areas of worn finish, or boards that cup or separate, call a professional—these problems usually need repair or refinishing beyond routine cleaning. You’ll want an expert to assess structural issues, match stain and finish, and avoid permanent damage. Don’t wait; moisture, rot, or widespread wear worsens quickly. A pro can sand, refinish, or replace boards safely, restoring value and beauty.
| Feeling | Action |
|---|---|
| Frustration | Call now |
| Sadness | Preserve value |
| Anxiety | Get assessment |
| Relief | Professional care |
| Pride | Restored floor |
Frequently Asked Questions
Can Pet Urine Permanently Discolor or Etch Finishes?
Yes — pet urine can permanently discolor or etch finishes. You’ll need to act fast: blot, neutralize with a mild cleaner, and refinish affected areas if stains or etching persist to restore appearance and protection.
Can Sunlight Cause Long-Term Color Changes in Wood Floors?
Yes — prolonged sunlight exposure will fade and darken wood unevenly, and it can alter finishes over time. You should use blinds, UV-filtering film, rugs, or move furniture periodically to limit permanent color changes.
Are Steam Mops Ever Safe on Sealed Hardwood?
They’re generally not safe; you’ll risk heat and moisture lifting or dulling the finish. Some manufacturers approve low-heat models for certain sealed hardwoods, so check specs first and test a hidden spot before regular use.
How Soon Can Furniture Be Replaced After Refinishing Floors?
You can typically replace furniture after 48–72 hours for light use, but wait 7–14 days for full curing. Use felt pads, lift rather than drag pieces, and avoid heavy traffic until the finish fully hardens.
Do Area Rugs Trap Moisture and Cause Floor Damage?
Yes — area rugs can trap moisture under them and damage floors if humidity or spills aren’t managed. You’ll want breathable rug pads, occasional lifting to air the floor, prompt spill cleanup, and regular monitoring to prevent problems.
Conclusion
You’ve got the basics down: know your floor type and finish, stick to gentle, pH-neutral cleaners, and avoid excess water or abrasive tools. Keep humidity and temperature steady, use mats and runners in high-traffic zones, and adopt daily habits that prevent grit and spills. Re-waxing or refinishing depends on wear and finish—call a pro for deep scratches, cupping, or worn-through finish. With regular care, your wood floors will stay beautiful for years.