The Ultimate Guide to Fermenting Vegetables at Home
If you want to turn ordinary produce into flavorful, probiotic-rich staples, you can learn simple, reliable fermentation techniques that fit your kitchen and schedule. You will master salt ratios, safe brining, and ways to troubleshoot common issues so your batches come out consistently. Start with basics like cabbage or carrots, and soon you will be adapting recipes and flavors. However, first, get the core steps right and the results will surprise you.
Understanding Vegetable Fermentation
Fermentation is a natural process where beneficial microbes convert sugars in vegetables into acids and gases, preserving them and creating tangy flavors.
You’ll receive probiotics, improved nutrient availability, and longer shelf life from fermented vegetables.
With simple salt brines and a bit of patience, you can transform ordinary produce into flavorful, healthful foods.
What is Fermentation?
Fermentation is when beneficial bacteria and yeasts transform sugars in your vegetables into acids, gases, and flavor compounds, which preserves food and creates probiotics.
You’ll learn how that simple microbial chemistry both keeps vegetables safe and boosts their taste and nutrition.
That’s why fermenting at home is an easy, low-energy way to extend produce and add healthy, complex flavors to your meals.
The Science Behind Fermentation
Because it’s a controlled transformation, you’ll see that fermenting vegetables is truly a partnership between microbes and their food.
Naturally occurring bacteria, mostly lactic acid bacteria, consume sugars in the vegetables and produce acids, gases, and other compounds that preserve the food and build flavor.
You learn how to ferment vegetable batches by managing salt, oxygen, temperature, and time so beneficial microbes dominate and spoilage microbes do not.
Why Ferment Vegetables?
Now that you know how microbes, salt, oxygen, temperature, and time shape a batch, it’s worth asking why you’d want to put vegetables through that process in the first place.
Fermenting boosts flavor, preserves produce without canning, increases nutrients and bioavailable vitamins, and introduces beneficial probiotics for gut health.
It’s inexpensive, low-effort, and turns surplus vegetables into tangy, versatile foods you’ll enjoy.
Benefits of Fermenting Vegetables
When you ferment vegetables at home, you’re boosting their nutritional value and creating natural sources of probiotics.
These friendly microbes can support your gut health and improve digestion.
You’ll also obtain more vitamins and increased bioavailability from the same vegetables.
Health Benefits of Fermented Vegetables
Although it might seem surprising, fermenting vegetables at home can boost nutrient availability, introduce beneficial microbes to your gut, and make produce last longer.
You’ll also reduce food waste, enjoy diverse flavors, and support immune resilience through regular consumption.
Ferments can aid digestion, help regulate appetite, and provide convenient, shelf-stable snacks that fit into simple, healthy meal routines you’ll keep returning to.
Nutritional Value and Probiotics
Curious about how fermenting vegetables changes their nutrition?
You boost vitamin availability, especially B vitamins and vitamin K, and often increase antioxidant activity.
Fermentation can reduce anti-nutrients such as phytic acid, releasing minerals including iron and zinc.
Beneficial lactic acid bacteria proliferate, adding live cultures to your food.
Those microbes also synthesize small amounts of vitamins while preserving vegetables naturally.
How Fermented Vegetables Improve Digestion
Fermentation breaks down tough plant fibers and pre-digests starches and proteins, making fermented vegetables easier on your gut than their raw counterparts.
They deliver live microbes that help balance gut flora, support digestion, and may reduce bloating.
Enzymes from fermentation aid nutrient absorption, and short-chain fatty acids produced during fermentation nourish colon cells, promoting regularity and overall digestive resilience.
How to Ferment Vegetables at Home
You’ll start by washing and prepping your vegetables, salting or brining them, and packing them tightly into a clean jar to begin the fermentation process.
You’ll need a few basic tools, including jars with lids or airlocks, a weight to keep vegetables submerged, a measuring spoon, and a clean towel, as well as ingredients such as non-iodized salt, filtered water, and fresh produce.
With those simple steps and supplies, you’ll be ready to ferment a wide range of vegetables at home.
Steps to Begin Fermenting Vegetables
Start by washing, trimming, and cutting your vegetables to the size and texture that suit the ferment you want.
Decide whether you’ll use a simple brine, dry-salt (wild) ferment, or a vinegar-based approach, since each method affects flavor and fermentation time.
Once you know your preparation and method, you’re ready to set up jars and begin the fermentation process.
Preparing Your Vegetables for Fermentation
When you’re preparing vegetables for fermentation, wash them thoroughly, trim damaged spots, and decide whether to leave them whole, slice, or shred based on the recipe and jar size.
Cut uniformly for even fermentation, weigh or measure salt brine, and keep tools clean.
- Cut to fit jars
- Use non-iodized salt
- Pack firmly with headspace
Choosing the Right Fermentation Method
Choosing a fermentation method comes down to the vegetable, your equipment, and how hands-on you want to be.
You’ll select quick salt-brine ferments for cucumbers and cabbage, dry-salt for firm roots, or vinegar for a faster, predictable result.
Use airlock jars for low-maintenance ferments, crocks for larger batches, and weights to keep vegetables submerged to prevent mold and off-flavors.
Essential Tools and Ingredients for Fermenting Vegetables
When you start fermenting, you’ll quickly see how essential the right salt is for flavor and safety. Use non-iodized salts such as sea or kosher salt at the correct ratio.
You’ll also need basic equipment: clean jars, weights to keep vegetables submerged, and lids that allow gases to escape or can be burped.
With just these simple ingredients and tools, you’ll be set to make consistent, tasty ferments.
The Importance of Salt in Vegetable Fermentation
Although it’s easy to overlook, salt is the single most important ingredient in vegetable fermentation because it controls microbial activity, draws out water to create brine, and preserves texture and flavor.
Therefore, getting the type and amount right will determine whether your ferment thrives or spoils.
You’ll choose and measure salt carefully:
- Use non-iodized, additive-free salt.
- Aim for 2 to 3 percent by weight.
- Adjust for produce water content.
Necessary Equipment: Jars, Weights, and Lids
A few simple tools will make your ferments safe and reliable.
You’ll need a sturdy glass jar or fermenter that leaves a little headspace, a weight to keep vegetables submerged, and a lid system that lets gas escape without allowing air back in.
Use nonreactive jars, glass or ceramic weights, and airlock lids or loose lids which you’ll burp daily.
Clean and durable tools prevent spoilage.
Different Methods for Fermenting Vegetables
You’ll learn three simple ways to ferment vegetables at home: classic lacto-fermentation, salt-based brines, and methods that skip vinegar.
Each method relies on encouraging beneficial bacteria and managing salt, time, and temperature.
I’ll explain how each method works and when you’d choose one over another.
Lacto-Fermentation: The Classic Approach
Lacto-fermentation uses naturally occurring lactic acid bacteria to preserve vegetables and give them a tangy flavor.
You can make lacto-fermented vegetables by packing produce in a salt brine or dry-salting to draw out juices, then weighing them down so they’re submerged while fermenting at room temperature.
I’ll walk you through basic ratios, timing, and simple tricks to keep your ferments safe and tasty.
What is Lacto-Fermentation?
Think of lacto-fermentation as a simple, time-tested way to transform vegetables using naturally occurring lactic acid bacteria.
You pack produce with salt and sometimes starter brine, keep it anaerobic, and let the microbes do the work, producing tangy, preserved flavors and beneficial probiotics.
It is natural, low-tech, and safe when done properly.
Flavors develop over days to weeks.
The results are crisp, sour, and probiotic-rich.
How to Make Lacto-Fermented Vegetables
When you want crisp, tangy vegetables with minimal fuss, the classic lacto-fermentation method is the easiest place to start.
Shred or chop your produce, salt it to draw out juices and create the right environment, pack it tightly into a clean jar so the brine fully covers the vegetables, and weigh them down to keep air out while wild lactic acid bacteria do the rest.
Keep jars at room temperature, burp daily, taste after three to seven days, then refrigerate to slow fermentation.
Using Salt for Fermentation
When you ferment vegetables with salt, you’re creating the brine that allows beneficial bacteria to do their work while keeping out unwanted microbes.
You’ll learn simple steps for salting and packing vegetables so they remain submerged and ferment evenly.
I’ll also show the common salt-to-water ratios so you can achieve predictable, safe results.
How to Ferment Vegetables with Salt
Although it appears simple, fermenting vegetables with salt relies on precise salt ratios and clean techniques to produce crisp, safe, flavorful results that you can enjoy for months.
You’ll pack vegetables, add salt, and weigh them below the brine. Monitor aroma and bubbling; trim mold.
Tips include:
- Use fresh produce and sanitized tools.
- Keep vegetables submerged.
- Taste periodically and refrigerate when you like the flavor.
The Salt-to-Water Ratio for Fermentation
A simple rule of thumb you can rely on is 2 to 3 percent salt by weight for most vegetable ferments.
Weigh the vegetables or the water and add salt equal to 2 to 3 percent of that weight to create a stable brine that encourages lactic acid bacteria while inhibiting spoilage microbes.
Use 2 percent for tender vegetables and 3 percent for dense ones.
You should adjust for taste and always dissolve salt fully.
How to Ferment Vegetables Without Vinegar
You don’t need vinegar to make safe, flavorful ferments.
Salt and time allow naturally occurring lactic acid bacteria to do the work.
Vinegar provides immediate acidity, but brine fermentation produces complex tang and probiotics through microbial activity.
Let’s compare how salt-based brines, whey-started ferments, and wild fermentation differ from using vinegar.
The Role of Vinegar in Fermentation vs. Salt
When you ferment vegetables without vinegar, you’re allowing naturally occurring lactic acid bacteria to perform the fermentation process, using salt to create the appropriate environment for safe and tangy preservation.
You’ll compare methods: vinegar jars provide immediate acidity, while salt brines develop flavor over several days.
Choose based on your desire for control, texture, and taste.
- Immediate acidity with vinegar
- Slow and complex brine fermentation
- Texture and salt control
Alternative Natural Fermentation Methods
If you want to ferment vegetables without vinegar, choose between salt brines, dry-salt wild ferments, and waterless methods that rely on the vegetables’ own juices.
Each method creates the anaerobic, salty environment that lactic acid bacteria need to convert sugars into tangy, preservative acids.
You’ll pack, weigh, and seal to exclude oxygen, monitor temperature, and taste periodically until acidity and flavor meet your preference.
Fermenting a Variety of Vegetables
You can ferment almost any vegetable by adjusting salt, time, and cut size to suit its texture and flavor.
I’ll show simple templates you can use to turn cabbage, carrots, beets, and more into reliable fermented recipes.
You’ll also learn how to make cultured vegetables with starter brines and flavor variations so you can experiment confidently.
How to Ferment Any Vegetable
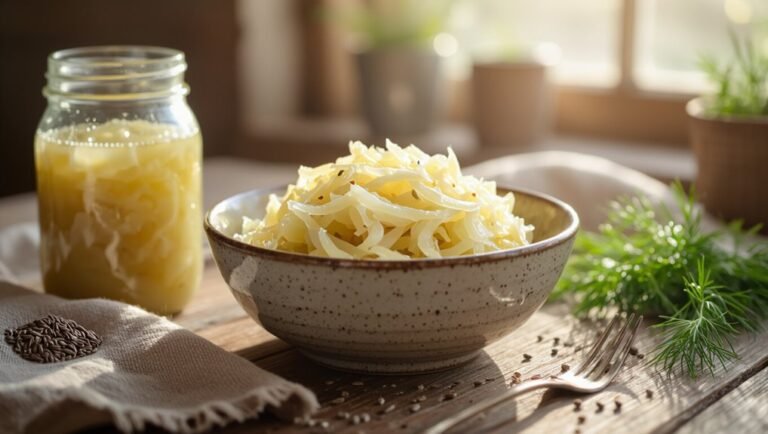
You can ferment almost any vegetable, but some, such as cabbage, carrots, cucumbers, and beets, provide the most consistent and delicious results.
Begin by selecting fresh produce, trimming or slicing it to the appropriate size, and utilizing a simple salt brine or dry-salt mash to promote fermentation.
I’ll guide you through specific methods for carrots, cucumbers, and beets so that you can choose the technique that best suits each vegetable.
Best Vegetables for Fermentation
When you start choosing produce for fermentation, pick vegetables that are dense, crisp, and low in moisture so they keep a good crunch and resist mushiness.
Cabbage, carrots, radishes, and cucumbers are classic examples, while harder roots such as beets and turnips also ferment reliably.
Cabbage is versatile for kraut and slaws.
Radishes create quick, peppery pickles.
Roots such as beets and turnips hold texture and flavor.
How to Ferment Different Vegetables Like Carrots, Cucumbers, and Beets
Having picked vegetables that hold up well, let’s look at how to ferment specific types such as carrots, cucumbers, and beets so each maintains the right texture and flavor.
Slice carrots thin or julienne them for crunch. Score cucumbers and use pickling salt and cool brine to prevent sogginess.
Roast or slice beets and ferment them with a slightly higher salt concentration for firmness. Monitor, taste, and adjust as necessary.
How to Make Fermented Vegetables Recipes
You can make simple, delicious fermented vegetable recipes with just salt, water, and fresh produce.
Try mixing carrots, cabbage, and radishes with garlic, dill, or chili flakes to see how herbs and spices change the flavor.
Keep notes on proportions and fermentation time so you can repeat the combinations you like.
Simple and Delicious Fermented Vegetable Recipes
Although fermenting might seem intimidating at first, you’ll find it’s straightforward and rewarding once you try a few basic recipes.
You’ll learn simple salt brines, timing, and visual cues. Start small, taste often, and adjust texture rather than technique.
- Quick sauerkraut: cabbage, salt, 1 to 2 weeks
- Pickled carrots: slice, brine, 5 to 7 days
- Fermented cucumbers: whole, cool spot, 7 to 10 days
Experimenting with Herbs and Spices for Flavor
Once you have gotten comfortable with basic brines and timing, it’s time to play with herbs and spices to lift those simple ferments into something memorable.
Start small: add dill, garlic, mustard seeds, or bay leaf.
Try ginger with carrots, coriander with cauliflower, or chili for heat.
Taste as they ferment, adjust future batches, and keep notes so your favorite combinations become repeatable.
How to Make Cultured Veggies
Cultured vegetables are simply vegetables transformed by beneficial bacteria into tangy, probiotic-rich foods that you can make at home.
You’ll start by salting or brining your chosen vegetables to create the right environment, then pack them tightly and let natural fermentation do the work.
With basic tools and a little patience, you can culture carrots, cabbage, cucumbers, and more to suit your taste.
What are Cultured Vegetables?
Think of cultured vegetables as everyday vegetables that have been transformed by friendly bacteria into tangy, shelf-stable foods rich in flavor and probiotics.
You’ll enjoy their bright texture, lasting preservation, and gut-supporting microbes. They’re versatile additions to meals and snacks.
- Enhanced flavor and acidity
- Natural preservation without refrigeration initially
- Live probiotics that support digestion
The Process of Culturing Veggies at Home
When you’re ready to ferment vegetables at home, the basic steps are simple: chop or shred what you’re using, salt it to draw out liquid, pack it tightly into a clean jar or crock so the brine covers the vegetables, and let beneficial bacteria do their work at a cool, stable temperature until the flavor and acidity suit you.
Monitor daily, release gas, taste after a few days, then refrigerate.
Advanced Tips for Fermenting Vegetables
Now that you have mastered basic ferments, you’ll learn how to can fermented vegetables safely to extend shelf life without losing probiotic benefits.
You’ll also receive tips for encouraging natural fermentation with wild yeasts and beneficial bacteria instead of relying on starter cultures.
Follow these techniques and you’ll confidently preserve flavors and nutrients for months.
How to Can Fermented Vegetables
If you want to keep your fermented vegetables for months or longer, canning can be a great option to preserve flavor and texture.
You’ll compare canning and refrigeration to decide which method suits each batch and your storage space.
I’ll walk you through safe canning steps and when it’s better to stick with the fridge.
Preserving Your Fermented Vegetables for Long-Term Storage
Although fermentation creates stable, flavorful vegetables, you’ll want a reliable method for storing larger batches long-term.
Canning is the option that allows you to preserve texture and flavor while keeping food safe and shelf-stable. You’ll follow steps for acid balance, headspace, and heat processing.
Tips include:
- Use tested recipes and jars.
- Maintain proper acidity and brine.
- Process in a boiling-water or pressure canner according to guidelines.
Canning vs. Refrigerating: Which is Best for Your Fermented Veggies?
Curious which method will keep your ferments tasting their best and safest?
You can refrigerate for short-term crispness and live probiotics. Simply transfer fermented veggies to jars and chill.
Canning stops fermentation, extends shelf life at room temperature, and kills microbes. Therefore, only can fully finished, acidified ferments.
Choose refrigeration for flavor and probiotics. Choose canning for stability and pantry storage.
How to Ferment Vegetables Naturally
When you ferment vegetables naturally, you’ll rely on careful salting, clean equipment, and consistent temperatures to encourage the right microbes.
You can harness wild cultures from the vegetables themselves or from starters such as whey or brine from a previous batch to kickstart fermentation.
Follow simple tests, including taste, smell, and bubble activity, to know when your ferment is progressing safely.
Tips for Ensuring Natural Fermentation
If you want consistent and safe fermentation every time, focus on controlling three things: salt ratio, temperature, and oxygen.
You’ll keep jars clean, weigh salt precisely, and monitor temperatures. Use these habits to prevent spoilage and encourage crisp and tangy results:
- Use 2 percent to 2.5 percent salt by weight.
- Keep the temperature between 60 and 72 degrees Fahrenheit (15 to 22 degrees Celsius).
- Make sure vegetables stay submerged under brine.
Using Wild Cultures for Fermentation
Ready to let nature do the work? You’ll rely on native yeasts and bacteria on produce and in your kitchen.
Use clean hands, unchlorinated water, and nonreactive containers. Salt concentration, temperature, and time steer which microbes dominate.
Taste often, discard if off-smelling, and save small successful jars as starters. Wild ferments vary, so record conditions to repeat favorable results.
Common Mistakes to Avoid When Fermenting Vegetables
You’ll encounter a few predictable mistakes, such as using too little salt, not weighing vegetables below the brine, or allowing temperatures to fluctuate.
Therefore, it helps to know what to watch for. If something goes wrong, you can often fix it by adjusting the salt, pressing the vegetables back under the brine, or moving the jars to a more stable location.
I’ll guide you through common problems and simple, safe remedies.
Mistakes to Watch Out for During the Fermentation Process
Watch your salt carefully.
Too much salt will halt fermentation, and too little salt allows unwanted bacteria to take over.
Keep the jar in a location where temperatures remain steady, since heat or cold can alter the fermentation process in ways that you don’t want.
Being precise with salt and the environment will help you achieve consistent and safe results every time.
Over or Under-Salting Your Vegetables
Because the right salt balance controls both safety and flavor, getting your brine wrong, whether too much or too little, will quickly ruin a batch.
You need consistent measurements, taste checks, and proper rinsing if needed.
- Measure salt by weight, not volume.
- Use recommended percentages, specifically 2 to 3 percent for most vegetables.
- If it’s too salty, rinse briefly and submerge in fresh brine.
Temperature and Environmental Factors Affecting Fermentation
Salt and temperature work together to steer fermentation, so once your brine is right, pay attention to where and when you ferment.
Keep jars at 65 to 75 degrees Fahrenheit for steady lactic acid development; cooler temperatures slow activity, while warmer temperatures invite yeast and spoilage.
Avoid direct sunlight, drafts, and fluctuating temperatures. Monitor regularly, move jars if needed, and don’t crowd containers.
Airflow and stable warmth matter.
How to Fix Common Fermentation Problems
If your batch develops off flavors or mold, don’t panic.
You can often spot and fix the issue quickly. Check salt levels, ensure vegetables stayed submerged, and remove any surface mold with a clean spoon.
Discard the whole jar only if mold has penetrated deeply or the smell is rotten.
I’ll walk you through simple tests and corrective steps so you can save good ferments and avoid repeat mistakes.
Troubleshooting Off Flavors and Mold Issues
When a batch develops off flavors or mold, you’ll want to act quickly to identify the cause and decide whether the ferment is salvageable.
Common culprits include insufficient brine coverage, contaminated equipment, incorrect fermentation temperature, or using damaged produce.
Assess the smell and texture, and discard any fuzzy mold.
Here are some steps to fix and prevent issues:
- Top up the brine and press the vegetables below the surface.
- Sterilize tools and jars.
- Adjust the temperature and use fresh produce.
How to Incorporate Fermented Vegetables Into Your Diet
Start by adding a spoonful of sauerkraut or kimchi to sandwiches, bowls, or salads for a bright, tangy kick.
You can also stir fermented vegetables into soups or omelets at the end of cooking to preserve their probiotic benefits.
Try replacing some condiments with fermented vegetables to boost flavor and nutrition without extra effort.
Enjoying Fermented Vegetables in Your Meals
You can brighten sandwiches, stir-fries, salads, and grain bowls with a spoonful of tangy fermented vegetables for instant flavor and texture.
Including them regularly supports gut health and boosts nutrient absorption without extra preparation.
Try swapping pickles or slaws into meals you already love to make fermented vegetables a simple daily habit.
Creative Ways to Use Fermented Veggies in Cooking
Although fermented vegetables have a bold flavor, they’re surprisingly versatile and can elevate everyday dishes with tang, crunch, and umami.
You’ll find they work equally well as condiments, mix-ins, or central ingredients.
Try these ideas to spark meals:
- Top tacos, bowls, or sandwiches for an acidic crunch.
- Fold into salads, grain dishes, or scrambled eggs.
- Simmer with stews, sauces, or stir-fries for depth.
Benefits of Including Fermented Vegetables in Your Daily Diet
When you make fermented vegetables a regular part of meals, they will boost flavor, add satisfying crunch, and deliver probiotics and nutrients that support digestion and overall gut health. You can add them to salads, sandwiches, bowls, or breakfasts to enhance taste and gut balance.
| Situation | Benefit |
|---|---|
| Breakfast | Gentle probiotic start |
| Lunch | Flavor lift |
| Dinner | Digestive aid |
| Snacks | Crunchy satisfaction |
Conclusion
You have learned how simple salt, clean equipment, and patience turn ordinary veggies into tangy, probiotic-rich foods that boost flavor and gut health. Start small, follow safe salt ratios and cleanliness, and experiment with different vegetables and methods such as lacto-ferments, brines, or quick pickles to find what you love. Do not be afraid to taste, adjust, and get creative. With practice, you will confidently add vibrant fermented vegetables to meals every day.