How to Make Wood Stars
You can make attractive wood stars in an afternoon by measuring and marking a precise template, cutting points on a miter saw or jigsaw, and gluing or splining joints for strength. Choose stable wood like pine or poplar for painted pieces, or oak and walnut for natural finishes. Sand, add accents like pyrography or inlay, then seal for protection. Follow safe tool and dust practices, and keep sizes and mounting in mind — more tips and step-by-step options follow.
Quick Build: Make a 5‑Point Wood Star in an Afternoon
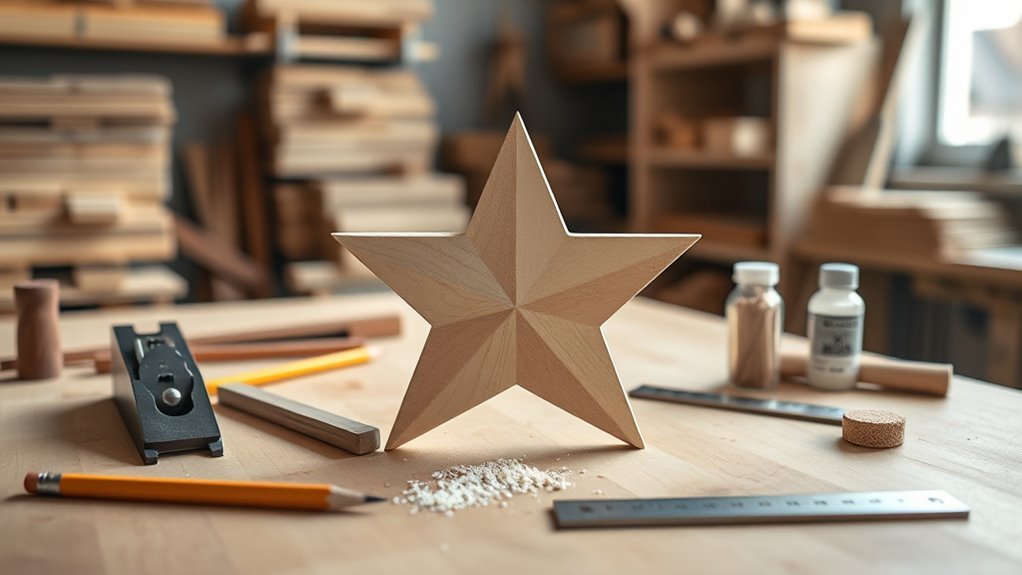
If you’ve got a few hours, basic tools, and a 1×6 board, you can cut, glue, and sand a clean 5‑point wood star by afternoon.
Measure and mark a center line, trace five equal isosceles triangles around a circle or use a printable template.
Cut each triangle or segment with a miter saw or jigsaw, keeping edges straight.
Dry-fit pieces, then apply wood glue thinly and clamp firmly until set.
After curing, sand seams flush with progressively finer grit.
Fill gaps with wood filler, sand again, and finish with paint or clear coat.
Display or hang proudly.
Best Woods for Decorative Wood Stars
When choosing wood for a decorative star, think about grain, weight, and how the species takes finish—these factors determine durability and appearance. You’ll pick wood that matches mood: warm oak for classic charm, pine for rustic ease, walnut for rich contrast, or poplar for painted pieces.
Consider softness for shaping and hardness for longevity. Finish choices bring out figure or hide knots. Handle and store lumber flat to avoid warping. Match thickness to hanging method so the star feels balanced.
Balance softness for shaping with hardness for durability; finish reveals grain or conceals knots, and store flat to prevent warping.
- Oak: sturdy, timeless, comforting
- Pine: humble, cozy, adaptable
- Walnut: elegant, dramatic, soulful
- Poplar: forgiving, bright, cheerful
Tools You Need for Cutting and Shaping Stars
Now that you’ve picked the right wood, gather the tools that’ll let you cut and shape clean, accurate star points. You’ll need a miter saw or miter box with a fine-tooth blade for angled cuts, and a coping or jigsaw for curves or tricky profiles.
Clamps secure pieces while you cut and glue. Use a block plane and sanding block with progressive grits to refine points and edges. A sharp carving knife or chisels help with small adjustments.
Keep safety gear—eye protection, hearing protection, and a dust mask—handy. A square and straightedge check alignment as you work.
Essential Measuring & Marking for Perfect Symmetry
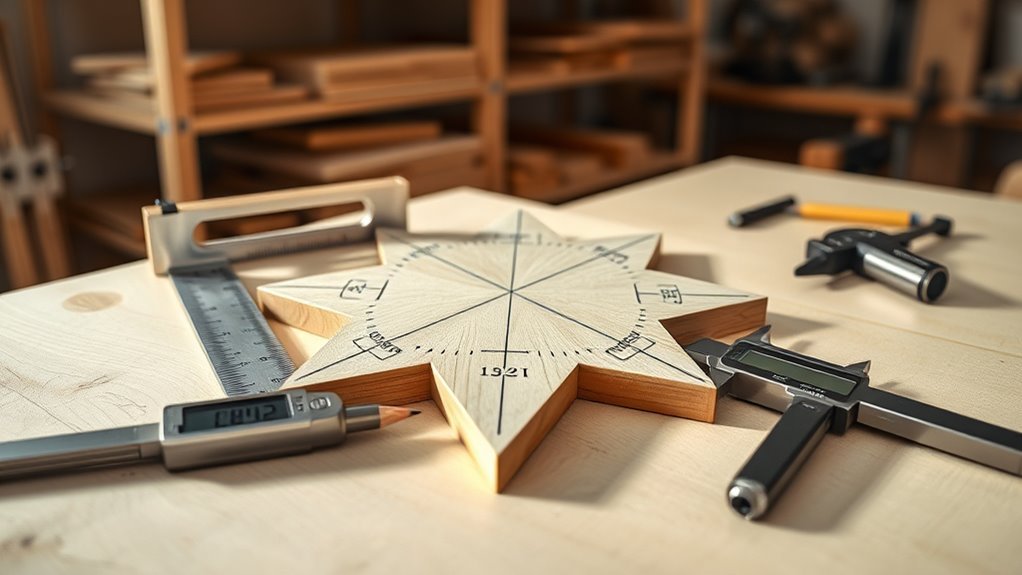
Because symmetry makes a star look professional, you’ll spend most of your time measuring and marking with care: lay out a clear center, transfer exact angles for each point, and mark cut lines that you can follow without hesitation. You’ll use a ruler, protractor, compass, and sharp pencil to create repeatable guides.
Check opposite points against one another, measure twice, and annotate reference marks so pieces align during assembly. Confidence comes from preparation; crisp, consistent marks reduce sanding and fuss later. Embrace precision and let clean lines lead your cuts.
- Pride in neat layouts
- Calm from predictable results
- Joy in balanced shapes
- Satisfaction in flawless joins
Cut Star Points With a Miter Saw : Safe Steps
Having laid out precise marks, you’re ready to cut the star points with a miter saw while keeping safety front and center. Wear eye and hearing protection, clamp the wood, and set the saw to the marked angle. Make test cuts on scrap, then cut slowly, letting the blade reach full speed before engaging. Keep hands well clear and use a push stick for small pieces. Check each piece against your layout; trim as needed. Clean blade and area after cutting.
| Step | Action | Safety tip |
|---|---|---|
| 1 | Set angle | Confirm detent |
| 2 | Clamp | Use hold-down |
| 3 | Test cut | Inspect scrap |
| 4 | Cut | Full blade speed |
| 5 | Check fit | Adjust as needed |
Cut Star Points With a Jigsaw or Bandsaw
If your star points are irregular or you’re working with curved profiles, reach for a jigsaw or bandsaw to cut them accurately and safely. You’ll trace the point pattern, clamp the blank, and follow the line slowly so the blade doesn’t wander. Use a fine-tooth blade for clean edges, keep hands well away, and wear eye and hearing protection. Sand lightly after cutting to refine the point.
- Feel the confidence as the blade follows your guide.
- Enjoy the quiet focus of smooth curves forming.
- Love the control when the cut lands exactly.
- Cherish the finished star’s crisp silhouette.
Make Small Stars on a Scroll Saw

When you need precise, delicate cuts for tiny stars, a scroll saw gives you the control to turn detailed patterns into clean, crisp points. Clamp thin stock flat, tape a printed pattern to the wood, and drill starter holes for internal cuts.
Choose a fine-tooth blade designed for scroll work and adjust speed for smooth edges. Feed slowly, guide curves with steady hands, and pause to clear dust.
Sand points lightly with fine files or folded sandpaper to preserve detail. Finish with a clear coat or stain applied thinly to avoid filling sharp angles.
One‑Piece Star: Cut From a Single Board
Although a single-board star looks simple, cutting one piece requires careful layout and steady sawing to keep points sharp and proportions true. You’ll mark a centered pentagon or star template, transfer it accurately, and clamp securely. Use a fine blade, follow lines slowly, and sand point edges lightly. Keep grain direction in mind to avoid tear-out.
After cutting, balance the star by checking symmetry and trimming where needed. Finish with oil or sealer to bring out wood figure.
- Pride when points meet perfectly
- Calm focus during each cut
- Satisfaction holding the finished shape
- Joy sharing a hand‑made ornament
Build a 5‑Point Star From Separate Wedges
When you build a 5‑point star from separate wedges, start by choosing wood with matching grain and stability so the points align cleanly.
Cut each wedge to precise angles and lengths so the pieces fit tight without gaps.
Finish by gluing and clamping the assembly squarely, checking alignment as the adhesive sets.
Choosing Wood and Grain
Because the grain and species you pick determine strength, appearance, and how the wedges glue and finish, choose carefully before cutting anything. You’ll want wood that aligns with your aesthetic and holds glue under stress. Consider quarter-sawn for stability or figured boards for drama. Match wedge grain direction for consistent bend and visual flow.
- Pick heartwood for warmth and character.
- Prefer straight grain for predictable strength.
- Use contrasting species to highlight points.
- Avoid highly friable or oily woods that resist glue.
Test scraps for glue bond and finish behavior so your star stays beautiful and sturdy.
Cutting Precise Wedge Angles
If you want clean, tight points, start by laying out exact wedge angles before you touch the saw. Measure five wedges at 36° each at the center, but cut complementary bevels so mating faces sit flush. Mark each piece, label sides, and use a reliable protractor or digital angle gauge. Set your miter or table saw to the calculated bevel, make test cuts on scrap, and tweak until edges align perfectly. Keep blade height low to reduce tearout and use a sacrificial fence when possible.
| Tool | Setting | Tip |
|---|---|---|
| Protractor | 36° | Verify twice |
| Saw | bevel + miter | test cut |
| Gauge | digital | lock angle |
Gluing and Clamping Assembly
Now that your wedge angles are dialed in and test cuts fit snug, it’s time to glue and clamp the five pieces into a star. Lay pieces flat, dry-fit, mark orientation, then apply a thin, even bead of glue to mating faces. Press pieces together, aligning tips precisely; clean squeeze-out quickly.
Use cauls and clamps to keep uniform pressure without crushing points. Let glue cure per instructions before removing clamps.
- Pride: watch gaps disappear.
- Focus: every clamp matters.
- Patience: curing makes it permanent.
- Joy: reveal a perfect star.
Butt Joints vs. Miters vs. Splines: Which to Use
When you’re joining the points and arms of a wooden star, the joint you pick affects strength, appearance, and how much cleanup you’ll do later.
Butt joints are fastest: cut ends square, glue, clamp; they’re fine for small decorative stars but show end grain and need careful sanding.
Miters hide end grain for a clean look and align profiles, but they sacrifice glue surface and demand precise cuts.
Splines add a thin inserted strip across a miter or butt, boosting alignment and glue area without bulky hardware.
Choose by balance of speed, aesthetics, and required joint strength for your star.
Reinforce Joints for Wall‑Mounted Wood Stars
When you plan a wall-mounted wood star, pick strong joinery like splines or biscuits to keep the points aligned under weight.
Add reinforcing hardware—corner brackets or flat braces—at hidden seams to stop racking.
Finally, seal joints with glue and screw or hang with secure mounts rated for the star’s weight.
Choose Strong Joinery
Because wall-mounted wood stars take stress at their points and seams, you’ll want joinery that keeps the pieces aligned and locked under load. Choose methods that resist shear and tension so your star stays true and safe.
You’ll prefer joints that bite into grain, spread force, and glue well. Match joint choice to thickness and style: simpler stars use fast, strong options; delicate designs need discreet strength.
- A joint that feels solid makes you proud.
- Visible seams that stay tight soothe your eye.
- Secure connections let you hang without worry.
- Craftsmanship shows in every confident corner.
Use Reinforcing Hardware
If you want extra confidence in your wall-mounted wood star, add reinforcing hardware at the seams and stress points to keep joints aligned and load-bearing.
Use small corner brackets, mending plates, or flat braces on the back where pieces meet; choose steel or brass for strength.
Pre-drill pilot holes to prevent splitting, and countersink screws so the star sits flush against the wall.
For heavier stars, add a central back plate crossing radial joints.
Tighten hardware evenly and check alignment before final screws.
Conceal visible hardware with wood plugs or paint for a clean finish without compromising support.
Seal And Secure Mounts
Before you hang your wood star, seal and secure every mount so the piece stays flat and safe on the wall. You’ll inspect joints, sand mating surfaces, and apply glue or wood filler where gaps exist. Clamp firmly, wipe excess, and let cure fully.
Add screws or hidden brackets for extra hold, countersink and plug for a clean face. Finish with sealant to protect edges from humidity.
- Pride: you made this by hand.
- Relief: no wobble, no fall.
- Joy: it looks crisp and intentional.
- Confidence: it will last through seasons.
Hide Fasteners for a Clean Star Face
When you want a smooth, professional-looking star, hide the screws and nails so the face reads as a single piece; countersinking fasteners and filling the holes keeps the wood’s grain and paint uninterrupted.
Start by drilling pilot holes sized for your screws, then countersink so heads sit below the surface. Use wood plugs, dowels, or filling compound to conceal hardware; press plugs flush and trim excess.
For painted stars, apply a grain-filling primer before touch-up. For stained finishes, match plug species and sand lightly only after filler cures.
Finish with paint or stain to blend repairs seamlessly into the star face.
Sanding Tips to Get Crisp Star Points
Before you sand, mark and mask each point so you keep edges sharp and avoid over-sanding adjacent faces.
Start with a coarser grit and work up through progressively finer grits to remove tool marks and refine the angles.
Finish by hand-sanding the tips with light, controlled strokes to preserve crisp points.
Mark And Mask Points
To get crisp star points, mark each tip precisely and mask the surrounding areas so you sand only where needed. You’ll trace tip outlines with a pencil or fine marker, then apply low-tack painter’s tape to protect valleys and faces. Sand pointedly, stopping when the mark vanishes.
- Feel each edge sharpen under your touch.
- Watch mistakes disappear behind careful masking.
- Enjoy the control as roughness yields to definition.
- Revel in the clean silhouette emerging from simple, steady work.
Masking saves detail and time; marking guides your hand so every point stays sharp and intentional.
Use Progressive Grits
As you refine each tip, work through grits progressively so you remove scratches without rounding the points—start with a coarser grit to shape, then move to medium and fine grits to refine and crisp the edges. Use a sanding block on flats and fingertips near tips, keeping motions with the grain where possible. Check edges often; stop when crispness appears.
| Grit Stage | Purpose |
|---|---|
| 80–120 | Shape points |
| 150–180 | Smooth transitions |
| 220+ | Crisp edges |
Vacuum between steps and inspect under good light to avoid over-sanding.
Finish With Hand Sanding
Now that your sanding progression has left the star shaped and free of heavy scratches, finish by hand sanding each point to sharpen and define the edges. You’ll work slowly, following grain direction, using folded sandpaper for control. Light pressure keeps points crisp; don’t round them out. Check frequently, rotate the piece, and blend any tiny flats into clean lines. Seal inspection with a fingernail test for burrs. Let the tactile feedback guide you.
- Feel the difference as edges become intentional.
- Enjoy the quiet rhythm of careful work.
- Take pride in each crisp point.
- Treasure the handmade precision.
Repair Gaps, Chips, and Cutting Mistakes
When you spot gaps, chips, or stray cuts in your wood stars, tackle them promptly so the flaws don’t get worse during sanding or finishing. Clean debris, then test-fit pieces; minor gaps accept thin wood glue and clamps.
For larger voids or missing points, pack with wood filler or epoxy, overfilling slightly to allow sanding to shape the repair. Use a small shim or scrap to rebuild sharp tips before gluing.
After cure, sand to match contours and remove tool marks. For visible seams, feather filler edges so grain transitions smoothly.
Check alignment and function before finishing steps.
Stain & Paint Choices for Rustic, Modern, and Farmhouse Stars
Now you’ll pick finishes that suit the look you want: warm, worn stains for rustic styles and sleek, matte or glossy paints for modern pieces.
For rustic options, try diluted walnut or weathered gray to highlight grain and imperfections.
For a modern feel, use smooth, high-build primers and satin or enamel paints in neutral or bold colors.
Rustic Stain Options
Curious which finish will best suit your wood star? You’ll want stains that enhance grain, age gracefully, and feel cozy. Pick warm tones for a lived-in look, or deep browns to ground a room.
Apply thin coats, wipe off excess, and sand lightly between layers for softness. Seal with matte poly for subtle protection.
- Cozy amber: invites warmth and nostalgia
- Weathered gray: suggests history and calm
- Tobacco brown: grounds and comforts the space
- Honey pine: brightens while keeping rustic charm
Trust your touch; rustic stains respond beautifully to gentle distressing.
Modern Paint Finishes
If you’ve loved the warm, worn look of rustic stains, you can still get that cozy feel while exploring modern paint finishes that layer color and texture differently.
Choose matte chalk paint for a soft, contemporary farmhouse vibe; it sands nicely to reveal edges. Try milk paint for authentic peeling and depth, or use layered acrylics—base coat, color wash, then dry-brush—to mimic aged patina.
For sleek modern stars, go semi-gloss in monochrome hues and seal with clear polyurethane.
Always test combos on scrap wood, sand between layers, and finish with your preferred topcoat for durability and the exact look you want.
Distress Techniques for a Weathered Look
Although a brand-new wood star looks crisp, distressing it gives your piece instant character and a lived-in feel. You’ll enjoy the process: sanding edges, beating corners, and layering paint to suggest years of stories. Work deliberately; small tweaks create authenticity.
- Lightly sand seams where hands would touch, revealing warm wood beneath.
- Use a hammer or chain for subtle dents that suggest adventure.
- Apply a watered-down wash to soften colors and hint at sun and rain.
- Rub with steel wool to blend layers and expose hidden tones.
You’ll leave a star that feels personal, worn, and warmly familiar.
Seal Outdoor Wood Stars for Weather Resistance
To keep your outdoor wood stars looking great, choose a durable exterior finish like spar urethane or marine varnish that stands up to UV and moisture.
Before you seal, sand and clean the surface thoroughly so the finish bonds evenly.
Apply thin, even coats and follow the manufacturer’s drying times for best weather resistance.
Choose Durable Exterior Finish
When you plan to display your wood stars outdoors, pick a finish that blocks moisture, UV rays, and mildew so your work stays crisp season after season. You’ll want something tough, clear, and breathable that won’t yellow or peel.
Consider oil-based spar urethane for flexibility, marine varnish for extreme exposure, or exterior-grade acrylic for easy maintenance. Apply thin coats and let cures fully between layers.
- Pride when your stars gleam, untouched by rain
- Relief knowing UV won’t fade delicate paint
- Confidence in a mildew-resistant surface
- Joy seeing years of outdoor beauty preserved
Prep Surface Thoroughly
Before you seal your outdoor wood stars, make sure the surface is clean, dry, and sanded smooth so finishes adhere properly and last. Remove dust with a tack cloth, scrape away loose paint or resin, and fill cracks with exterior wood filler. Sand filled areas flush and recheck for grit.
Wipe with mineral spirits or a recommended cleaner to lift oils and residue, then let the wood dry completely. Mask any hardware, apply a high-quality primer if using paint, and choose a brush or sprayer for even coats. Follow manufacturer dry times and apply two topcoats for durable weather resistance.
Decorative Finishes: Waxing, Gilding, and Glazes
Though often subtle, decorative finishes like waxing, gilding, and glazes can transform plain wood stars into striking focal pieces. You’ll choose among them based on the look, durability, and effort you want.
You’ll use wax for soft sheen and tactile warmth, gilding for luminous accents, and glazes to deepen grain or add patina. Apply thin layers, build gradually, and test on scrap.
Seal waxed areas sparingly. Protect gilded leaf with varnish. For glazes, wipe excess to reveal texture. Let each coat cure fully before handling.
- delight: touchable warmth
- awe: shimmering edges
- nostalgia: aged depth
- pride: handcrafted finish
Attach Hanging Hardware and Freestanding Stands
If you want your wood star to hang gracefully or stand proudly on a shelf, pick hardware that matches its size and weight and install it securely.
For hanging, use D-rings, sawtooth hangers, or heavy-duty picture wire for larger pieces; pre-drill pilot holes to prevent splitting and countersink screws for a flush finish.
For lightweight ornaments, glue-on hooks or small eye screws work fine.
For freestanding display, attach a simple cleat, angled block, or removable folding stand to the back so the star tilts slightly forward.
Test stability, adjust placement, and conceal hardware for a polished look.
Size Patterns for Ornaments, Wall Art, and Yard Stars
Decide what you want each star to do before cutting—tiny ornaments need different proportions than wall art or yard displays. Use the ornament size guide for small, lightweight pieces.
Follow wall star dimensions for eye-level impact, and scale up yard star measurements for outdoor visibility. I’ll walk you through exact templates and tips for each.
Ornament Size Guide
Wondering what size star will work best for your project? You’ll pick sizes by purpose: tiny for ornaments, medium for tabletop displays, larger for porch décor. Think about balance, visibility, and attachment method so your piece feels intentional.
- Tiny (1–3″) — delicate, intimate, perfect for tree branches.
- Small (4–6″) — charming, versatile, fits gift tags and wreaths.
- Medium (7–10″) — noticeable on mantels or shelves, makes a statement.
- Large (11–16″) — bold for entryways or porch hooks without overpowering.
Measure twice, visualize placement, and choose a size that sparks joy and fits your space.
Wall Star Dimensions
When planning wall stars, match the pattern size to the viewing distance and mounting surface so your piece reads correctly from across the room.
Choose diameters based on room scale: 12–18 inches for small nooks, 24–30 inches for focal walls, and 36–48 inches for large, high-ceiling spaces.
Consider edge width and point length so shadows and details remain visible from typical sightlines.
Multiply pattern dimensions if grouping multiples to maintain visual balance.
Account for hanging hardware depth and wall texture; flatter walls allow thinner profiles, textured surfaces may need deeper backing for secure mounting and correct visual impact.
Yard Star Measurements
How large should your yard star be to read well from the street and still fit your yard? You’ll balance visibility and scale: 3–6 ft works for most front yards, 6–10 ft suits larger properties, and modular panels let you expand later. Pick thickness and mounting for wind resistance.
Consider sightlines, driveway placement, and neighbor harmony. Aim for proportions that feel bold but not overpowering.
- Imagine smiling neighbors spotting it at dusk.
- Picture kids running toward a giant, welcoming shape.
- Feel pride when paint and grain catch light.
- Enjoy compliments that warm your chest.
Make Printable, Scalable Star Templates
Before you cut any wood, create printable, scalable star templates so you can test sizes and shapes on paper first.
Sketch or use simple software to draw the star points, inner angles, and overall diameter. Save as a high-resolution PDF or SVG so lines stay crisp when printing.
Include registration marks and a ruler or grid for quick reference.
Print at full size, tape sheets together for larger templates, and trace onto cardstock for durability.
Label each template with dimensions and orientation.
Try multiple variations to confirm aesthetics and fit before transferring a final outline to your wood.
Scale Designs Up or Down Without Losing Proportion
Now that you’ve finalized paper templates, you’ll want to scale those shapes accurately so the star keeps the same proportions at any size. Use a simple scale factor—measure one dimension, multiply by the factor, and apply it uniformly. Trace grids or use a copier/printer scaling percentage for consistent results. Keep line weights and kerf compensation in mind so joints remain tight.
- You’ll feel confident when angles stay true.
- You’ll avoid frustration from mismatched points.
- You’ll appreciate how repeatable steps save time.
- You’ll enjoy seeing small sketches become bold, large stars.
Personalize With Carving, Pyrography, and Inlay
When you want to give your wooden star a unique touch, carving, pyrography, and inlay offer complementary ways to add texture, tone, and contrast. Choose one technique or combine them: low-relief carving emphasizes facets and catches light; pyrography adds fine lines, shading, or patterns with controlled heat; inlay lets you introduce contrasting woods, metals, or resin in star points or centers.
Sketch designs, test on scrap, and work from general shapes to details. Keep tool strokes deliberate, follow grain, and finish surfaces smoothly before sealing. Small accents transform a simple star into a distinctive, handcrafted piece.
Safe Power Tool Use & Dust Collection for Small Projects
While you work on small wooden stars, treat power tools with the same respect you’d give larger projects: wear eye and hearing protection, secure the workpiece, and keep hands clear of blades and bits using push sticks or clamps. Use guards, check blades, and unplug tools before adjustments.
Keep a shop vacuum or dedicated dust extractor at the source; small particles damage lungs and finish. Work in a ventilated area and wipe surfaces with a tack cloth.
Keep dust captured at the source—vacuum or extractor, ventilate the space, and finish with a tack cloth.
Emotional reminders:
- You’re protecting your hands and future projects.
- Breathing clean air keeps you creating longer.
- A tidy bench calms your mind.
- Safety fuels confidence.
Estimate Materials, Cost & Time by Star Size
Because star size directly affects how much wood you need, how long each step takes, and what tools or supplies are worthwhile, you should pick your target dimensions before cutting any stock.
For a 4–6″ decorative star, one 1×6 board yields several pieces; you’ll spend 30–60 minutes and minimal fasteners.
A 12–18″ wall star needs wider stock or glue-ups, about 2–3 hours and stronger joinery.
Large outdoor stars (24″+) require exterior-grade wood, weatherproof finish, and more clamps; plan for half a day and higher fastener cost.
Estimate scraps (10–20%), finish, and hardware when totaling cost and time.
Troubleshooting: Warped Wood, Loose Joints, and Finish Issues
You’ll want to spot and prevent warped boards early by storing lumber flat, acclimating it to your workspace, and choosing properly dried stock.
If joints feel loose, tighten or reinforce them with glue, clamps, biscuits, or screws to restore strength.
For finish problems, sand back any flaws, clean the surface, and reapply or seal with the appropriate finish.
Preventing Warped Boards
How do you keep boards flat so your wood stars come out crisp and true? You’ll fight warp by controlling moisture, support, and storage. Seal both faces quickly, let lumber acclimate, and clamp during gluing. Check each board before cutting.
- Feel the curve; don’t ignore a slight bend.
- Imagine a perfect star; salvage only what fits that vision.
- Hear the snap of a well-clamped joint and relax.
- See your finished piece lay flat and proud.
Take small preventative steps now so your stars stay true, beautiful, and stress-free through assembly and finish.
Strengthening Loose Joints
Once you’ve kept boards flat and glued up tightly, the next challenge is reinforcing any joints that still feel loose so your star won’t fall apart over time. Inspect each seam, wiggle pieces to locate movement, then disassemble marginal joints if possible.
Clean old glue with a scraper and sandpaper. Apply fresh wood glue, clamp snugly, and let cure fully.
For persistent play, add discrete reinforcements: small dowels, splines, or thin biscuits across the joint, or brass corner pins for hidden strength.
Finally, sand flush and re-glue any trim. Test rigidity before finishing the star.
Fixing Finish Problems
Wondering what to do when your star’s finish doesn’t go to plan? You can fix blotches, drips, or cloudy spots without starting over. Sand lightly, clean dust, and spot-treat with compatible finish.
For small runs, scrape gently and recoat; for cloudy areas, try oil or solvent wipe depending on finish type. If warping reappears, clamp and rehydrate cautiously.
- Frustration when a perfect piece looks ruined
- Relief when simple repairs restore beauty
- Pride after rescuing your work
- Confidence to try more complex finishes
Take your time, match products, and test on scrap before committing.
Frequently Asked Questions
Can I Make Multi-Point Stars (7, 8, 12 Points) Using These Techniques?
Yes — you can make 7, 8, 12-point stars with these techniques. You’ll adjust angles, templates, and cutting sequences, use precise layout and jigs, and sand/joint carefully for tight seams and balanced points.
How Do I Incorporate LED Lighting Into a Hollow Wood Star?
You’ll route wiring through a drilled hole, mount LED strips or puck lights inside with adhesive, hide the strip behind a diffuser (thin frosted acrylic), secure a battery pack in a rear cavity, and add a switch for access.
What Are Kid-Friendly Modifications for a Safe Beginner Project?
Use rounded edges, pre-cut kits, and soft sanded wood; skip power tools, use child-safe glue and battery LED strips with covered wires; supervise closely, provide safety goggles, and let kids paint with non-toxic, washable paints.
Can I Use Reclaimed or Pallet Wood With Unknown Species/Stability?
You can, but you shouldn’t assume safety or stability; inspect for rot, nails, chemical stains, and moisture, sand and test a scrap, clamp securely, and seal or stabilize questionable pieces before cutting or using them in your project.
How Do I Make a Star That Doubles as a Functional Shelf or Hook?
Build a thicker, reinforced star with a flat back, secure it to studs or use heavy-duty anchors, add a narrow shelf ledge or attach hooks beneath, and finish with sealant so it’s sturdy, level, and load-bearing.
Conclusion
You’ve got everything you need to make beautiful wood stars—now it’s your turn to build one. Follow the measuring and cutting steps carefully, use the right wood and tools, and keep safety and dust control in mind. If something doesn’t fit or finish right, troubleshoot with sanding, clamps, or a different adhesive. Personalize with carving, pyrography, or inlay, and enjoy the satisfaction of making a handmade star you’ll be proud to display.