How to Waterproof Wood
To waterproof wood, start by cleaning and fully drying the surface, then test your chosen sealer on scrap wood. Sand smooth and remove dust between coats if the product requires it. Apply thin, even layers of a penetrating oil or a film-forming sealer, follow manufacturer drying times, and pick UV-resistant options for outdoors. Recoat on the recommended schedule and watch for darkening or soft spots as signs it needs attention. Keep going to learn tips for climates, wood types, and winter care.
How to Waterproof Wood: Quick Practical Answer
If you want a quick, reliable way to waterproof wood, start by cleaning and drying the surface.
Then apply a suitable sealer—like a penetrating oil, exterior-grade polyurethane, or a water-repellent preservative—following the manufacturer’s instructions for coats and drying times.
Then seal with a suitable product—penetrating oil, exterior polyurethane, or water-repellent preservative—following the maker’s coat and drying guidance.
Next, sand smooth between coats if instructed, wipe off dust, and maintain ventilation while finishes cure.
For outdoor items, pick UV-resistant products and recoat on the schedule recommended.
Apply thin, even layers with a brush or cloth to avoid runs.
Store and dispose of solvents safely, and test on scrap wood to confirm appearance and adhesion before treating the whole piece.
When to Waterproof Wood : Signs You Need It
When wood starts darkening, flaking, or soaking up water instead of beading, it’s time to waterproof it. You should act when you notice swelling, persistent stains, or mildew, and after visible surface wear from foot traffic or sun. Exterior decks, window sills, and boat trim need faster attention. Treat soon to prevent rot and costly repairs.
| Sign | Action |
|---|---|
| Dark stains or wet patches | Dry, clean, test absorbency |
| Flaking finish or rough grain | Sand, prep, apply sealer |
| Mildew or soft spots | Remove, repair, seal |
Check annually or after heavy weather.
Which Wood Types Absorb Moisture Most
You’ll notice softwoods like pine and fir soak up water faster because their higher porosity and open grain let moisture penetrate more easily.
In contrast, many tropical hardwoods—while dense—can still absorb moisture if they’re not properly dried or finished, though some species resist it better.
Knowing these differences helps you pick the right wood and protection for wet conditions.
Softwoods And Porosity
Because softwoods come from conifers with simpler, more uniform cell structures, they tend to absorb and release moisture more readily than most hardwoods. You’ll notice species like pine, fir, and cedar have larger earlywood pores and less dense latewood, so water soaks in faster and dries quicker.
That porosity makes them lighter and easier to work, but it also raises swelling, shrinking, and staining risks if you don’t seal them. When you waterproof softwood, choose penetrating sealers or oils that fill cell voids and follow with a surface coat for UV and abrasion protection to limit moisture cycling.
Tropical Hardwoods Absorption
Softwoods tend to be more porous, but many tropical hardwoods absorb moisture differently due to denser, more complex cell structures. If you’re comparing species, expect variability driven by grain, oil content, and extractives.
You’ll find ebony, teak, and ipe resist soaking because natural oils and tight fibers slow water uptake, so they need lighter sealing.
Others like meranti or some mahoganies absorb more, especially when quarter-sawn or end-grain is exposed.
Test small samples: note initial absorption, swelling, and drying times.
Choose finishes compatible with natural oils, guarantee joints are sealed, and maintain periodic inspections to catch moisture intrusion early.
How Climate Affects Waterproofing Choice
How does where you live change the waterproofing you should choose? You’ll match products to climate: wet, dry, freeze-thaw, coastal salt, or variable seasons. Choose breathable finishes for humid zones to avoid trapped moisture; pick flexible, elastic coatings where timber moves with temperature swings. In coastal areas, prioritize salt-resistant formulations and frequent inspections. For dry climates, UV-stable finishes prevent cracking. Here’s a quick comparison:
| Climate | Main Risk | Recommended trait |
|---|---|---|
| Humid | Mold, trapped moisture | Breathable |
| Freeze-thaw | Cracking | Elasticity |
| Coastal | Corrosion | Salt-resistant |
| Dry/UV | Fading | UV-stable |
Waterproofing Decision: Oil Vs. Film-Forming Sealers
When you’re deciding between oil-based and film-forming sealers, focus on the trade-offs: oils penetrate and nourish wood, enhancing grain and allowing some moisture exchange, while film-formers sit on the surface to block water and provide a harder protective layer.
You’ll weigh appearance, maintenance, and durability: oils give a natural look and are easy to spot-repair, but need reapplication sooner. Film-formers create a tougher barrier and last longer against abrasion and standing water, though they can peel and hide grain.
Match your choice to exposure, traffic, and willingness to maintain; test on scrap before committing.
What Penetrating Oils Do and When to Use Them
Because penetrating oils soak into the wood’s fibers rather than forming a film on the surface, they stabilize and repel moisture from the inside out while keeping the grain visible and tactile. You’ll use them when you want a natural appearance, easy maintenance, and protection for exterior wood like decks, siding, or furniture.
Penetrating oils soak into wood, repelling moisture and preserving a natural, tactile grain for exterior surfaces.
Apply to clean, dry wood; repeat periodically as oils wear. They don’t build a hard layer, so they’re not ideal where heavy abrasion or chemical resistance is required.
- Use for porous, unfinished wood outdoors.
- Reapply seasonally or as finish dulls.
- Pair with UV inhibitors for sunny exposure.
Varnish Vs. Polyurethane for Waterproofing Wood
Although both varnish and polyurethane create hard, water-resistant surfaces, they differ in composition, durability, and appearance, so you’ll want to pick based on the wood’s use and look.
Varnish (typically oil- or resin-based) builds a flexible, UV-resistant film that’s favored outdoors and on boats. It ages gracefully and can be repaired by re-coating.
Polyurethane (oil- or water-based) forms a tougher, more abrasion-resistant layer ideal for floors and high-traffic furniture. Water-based polyurethane dries clear, won’t yellow much, and smells less.
Choose varnish for exterior exposure and easier spot repairs; choose polyurethane for indoor wear and maximum scratch resistance.
What Water-Repellent Preservatives Do for Wood
If you want wood to shed moisture and resist decay without changing its look much, water-repellent preservatives penetrate the fibers to slow water absorption and deliver fungicide or insecticide protection at the same time. You apply them to raw or weathered wood to reduce swelling, cracking, and rot while keeping the grain visible.
They don’t form a film like paints or varnishes, so you’ll reapply periodically for continued performance. Choose formulations for exterior exposure and follow drying times for best penetration.
- Extend service life by limiting water ingress
- Prevent fungal growth and insect damage
- Maintain natural appearance with breathable protection
When Paint Alone Provides Waterproofing
When you coat properly prepared exterior wood with a high-quality, exterior-grade paint and maintain it, the paint’s film can act as an effective waterproof barrier by sealing pores, shedding rain, and preventing direct moisture uptake.
You’ll get best results on smooth, tight-grained lumber or previously primed surfaces. Rough, weathered, or untreated wood leaks paint protection and traps moisture.
Best results come from smooth, tight-grained or primed wood; rough, weathered, or untreated surfaces shed protection and trap moisture.
Apply appropriate primer, two finish coats, and follow drying times. Inspect and touch up chips, cracks, and seams promptly. Keep caulking intact around joints and fasteners.
Remember paint resists moisture but doesn’t replace structural flashing, drainage, or proper ventilation.
Clear Sealers for Indoor Wood: When to Use
Because indoor wood rarely faces heavy rain or UV, clear sealers give you protection without changing the look of the grain—use them to resist spills, stains, and everyday wear on furniture, trim, and floors.
You’ll pick a water-based poly or penetrating oil when you want fast drying, low odor, and easy maintenance. Apply thin coats, sand lightly between layers, and follow label instructions to avoid tacky finishes.
Use clear sealers when appearance matters and moisture exposure is moderate, not structural. They won’t replace paint for heavy-duty waterproofing but preserve natural aesthetics effectively.
- Furniture and tabletops
- Trim and moldings
- Interior hardwood floors
Test Wood Moisture and Target Levels Before Sealing
Before you seal, measure the wood’s moisture with a reliable meter to know whether it’s within the safe range for your finish. Aim for the manufacturer’s recommended target—typically 6–12% for indoor wood and slightly higher for exterior applications.
If the readings are too high or low, adjust moisture by drying, acclimating, or reconditioning the wood before applying any sealer.
Measure Wood Moisture
How dry is your wood right now, and is it dry enough to seal? You’ll check moisture with a meter: pin-type for surface readings or pinless for deeper moisture. Test several spots—ends, center, and near knots—to get an accurate picture. Record values and repeat after any drying steps. If readings fluctuate, allow more drying time and retest.
- Use a calibrated meter and press firmly for consistent readings.
- Test multiple boards and locations to avoid hidden wet areas.
- Log results and dates so you can compare before and after drying efforts.
Desired Moisture Levels
What moisture level should you aim for before sealing? You should test each board with a moisture meter and target a reading appropriate to its environment: indoors 6–8% for heated, 8–12% for unheated; exterior decking 10–15% is acceptable if local climate is humid.
Matching sealer recommendations matters—check product specs for maximum allowable moisture. Also measure several planks and different thicknesses; wood can vary. If readings vary widely, don’t seal until levels are consistently within target range.
Record readings and location for future reference so you can compare seasonal changes before applying a long-lasting finish.
Adjust Moisture Before Sealing
Now that you’ve measured moisture and recorded readings, you’ll need to bring any out-of-range boards into the target band before sealing. You’ll test adjacent boards, note extremes, and decide whether drying or humidifying is needed. Use a calibrated meter and retest after adjustments. Aim for a consistent range to prevent finish failure or warping.
If moving boards isn’t possible, stagger sealing to allow equilibration.
- Air-dry or use fans to lower moisture slowly.
- Use a humidifier in dry conditions to raise moisture safely.
- Recheck after 24–72 hours before applying any waterproofing.
How to Measure Moisture: Tools and Methods
Before you apply any sealer or finish, you need to know how wet your wood really is—because moisture determines whether coatings will bond, cure, or peel. Use a moisture meter: pin meters measure surface moisture via electrodes; pinless meters scan deeper noninvasively. Check multiple spots and across board thickness for consistent readings. For accuracy, let newly exposed wood acclimate before testing. Record ambient humidity and temperature—these affect readings. If readings exceed the finish manufacturer’s limit, dry the wood first. Use the table below to compare simple choices and pick the right tool for your project.
| Tool | Best use |
|---|---|
| Pin meter | Precise spot checks |
| Pinless meter | Quick surface scans |
| Hygrometer | Room humidity |
| Oven-dry (lab) | Reference standard |
Preparing New Wood for Waterproofing
Before you waterproof new wood, pick lumber suited to outdoor use—rot-resistant species or properly treated boards will last longer.
Clean the surface thoroughly, removing sawdust, mill glaze, and contaminants so finishes adhere evenly.
Check the moisture content with a meter and wait until it’s within the recommended range before applying any sealant.
Choosing the Right Lumber
Although you can waterproof many types of lumber, choosing species and grades that resist moisture and decay will make the job far easier and longer-lasting. You’ll pick wood that’s naturally durable or treated, avoid low-grade boards with many knots, and prefer straight, well-seasoned stock to reduce movement and gaps once sealed.
Match lumber to the environment: exterior decks need rot-resistant species; indoor humid spaces can use stable hardwoods. Also check for proper grading stamps and kiln-drying marks so coatings adhere predictably.
- Use rot-resistant species (cedar, redwood)
- Prefer kiln-dried, clear grades
- Avoid high-knot, warped boards
Surface Cleaning Techniques
When you’re preparing new wood for waterproofing, clean, dry, and smooth surfaces guarantee coatings bond properly and last longer. Start by brushing off sawdust and debris with a stiff brush, then wipe with a tack cloth to catch fine particles.
Sand with progressively finer grit, ending around 120–150 for most finishes, and remove sanding dust thoroughly.
Degrease oily areas with mineral spirits or a mild detergent, rinsing and letting the wood dry fully.
Spot-clean resinous bleed with denatured alcohol.
Work in a well-ventilated area and wear gloves and eye protection to keep the surface ready for sealers.
Moisture Content Checking
After cleaning and smoothing the surface, check the wood’s moisture content so your waterproofing will bond and perform correctly. You’ll prevent peeling and mildew by ensuring the wood is dry enough before you apply sealers.
Use a reliable moisture meter, test multiple spots, and compare readings to the product’s recommended range. If levels are too high, let the wood acclimate in a dry, ventilated area or use fans and dehumidifiers to speed drying.
Record readings and retest before coating.
- Use a pin or pinless meter for consistent results.
- Target 6–12% for indoor, 10–15% for exterior.
- Test end grain and face.
Cleaning and Prep for Weathered or Dirty Wood
Because weathered or dirty wood won’t hold sealers evenly, you need to clean and prepare the surface before waterproofing.
Begin by removing loose debris with a stiff broom or brush, then rinse with water.
Use a mild detergent or a wood cleaner diluted per instructions to lift oils, mildew, and grime; scrub with a nylon brush along the grain.
Rinse thoroughly and let the wood dry completely—48 hours in sun or less with good airflow.
Patch gaps or loose boards, tighten fasteners, and sand rough spots lightly to guarantee an even surface.
Test a small area before applying any sealer.
Safe Ways to Remove Old Finish Before Resealing
If the old finish is flaking, chalky, or glossy enough to repel a new sealer, strip it safely before resealing to guarantee proper adhesion and an even look. You’ll choose between chemical strippers for intricate moldings, heat guns for thick poly finishes, or sanding for flat surfaces.
Work outdoors or in ventilated spaces, wear a respirator, gloves, and eye protection, and test a small area first. Dispose of stripper residues per local rules.
- Use a citrus or biodegradable stripper for minimal fumes.
- Sand with a random-orbit sander, finishing by hand in grain direction.
- Heat-strip high-build varnish cautiously to avoid scorching.
Fixing Rot and Structural Damage Before Sealing
When you find soft, crumbling wood or gaps that let water collect, address rot and structural damage before sealing so your waterproofing lasts. Remove rotten sections, probe surrounding timber, and dry the area. Use epoxy consolidant for small decay and splice in new wood for larger failures. Guarantee fasteners and supports are sound, and replace joists or posts if compromised. Allow treatments to cure fully, then sand and clean before applying sealant.
| Inspection | Fix | Verify |
|---|---|---|
| Probe soft spots | Remove rot | Check firmness |
| Treat with epoxy | Sister/replace lumber | Confirm dryness |
Repairing Cracks and Gaps Before Waterproofing
Before you waterproof wood, check how deep and wide each crack is so you can pick the right repair method.
Choose a filler rated for exterior use and the joint size—epoxy for deep gaps, flexible caulk for movement-prone seams.
Once filled, smooth the repair and seal the joints to guarantee a continuous waterproof barrier.
Assess Crack Depths
How deep are those cracks, really — and will they hold water or let it through? You examine each split with a probe and light, looking for through-cracks versus surface checks.
Measure depth with a caliper or ruler, mark sections needing attention, and note hidden gaps under paint or finish.
- Probe technique: insert a thin pick, feel for void depth and listen for hollowness.
- Visual cues: dark staining or mold suggests deeper intrusion toward the core.
- Measurement: record widths and depths to prioritize repairs and estimate filler or reinforcement.
Accurate assessment prevents missed leaks and guarantees effective waterproofing.
Choose Appropriate Filler
You’ve mapped crack depths and now must pick the right filler to match each gap’s size, movement, and exposure. Choose elastic sealant for gaps that shift, epoxy for structural fills, and wood putty for shallow cosmetic repairs. Match filler stiffness to wood movement, and pick UV- and water-resistant products for exterior work. Test adhesion on scrap, follow cure times, and avoid overfilling; trim excess while pliable. Clean debris and ensure dry surfaces before application. Note manufacturer limits for paintability and sanding before proceeding to smoothing and joint sealing.
| Filler Type | Best Use |
|---|---|
| Epoxy | Structural gaps |
| Silicone | Flexible joints |
| Polyurethane | Exterior waterproofing |
| Wood putty | Surface blemishes |
| Acrylic caulk | Paintable seams |
Smooth And Seal Joints
Once your fillers have cured, smooth and seal each joint to create a continuous, watertight surface that bonds well to the waterproofing layer. You’ll sand flush with surrounding wood, clean dust, and inspect for gaps.
Use a compatible sealant—polyurethane for exterior, silicone for wet areas—to guarantee adhesion. Apply sealant in a single, steady bead, then tool it tight into the gap with a wet finger or spatula.
Allow full cure before coating.
Pay attention to movement joints and corners; they need flexible sealant and proper tooling to prevent future failure.
- Sand, clean, inspect
- Apply compatible sealant
- Tool and cure properly
Choosing Brushes, Rollers, and Sprayers
Because the right applicator controls finish quality as much as the waterproofing product itself, pick brushes, rollers, and sprayers that match the coating type and surface texture. You’ll want natural-bristle for oil-based finishes, synthetic for water-based, foam rollers for smooth panels, and thicker naps for rough decking. Sprayers speed large areas but need thinning and masking. Clean tools immediately to avoid ruined finishes. Test a small patch to confirm coverage and texture before committing.
| Tool | Feeling |
|---|---|
| Brush | Confidence |
| Roller | Ease |
| Sprayer | Freedom |
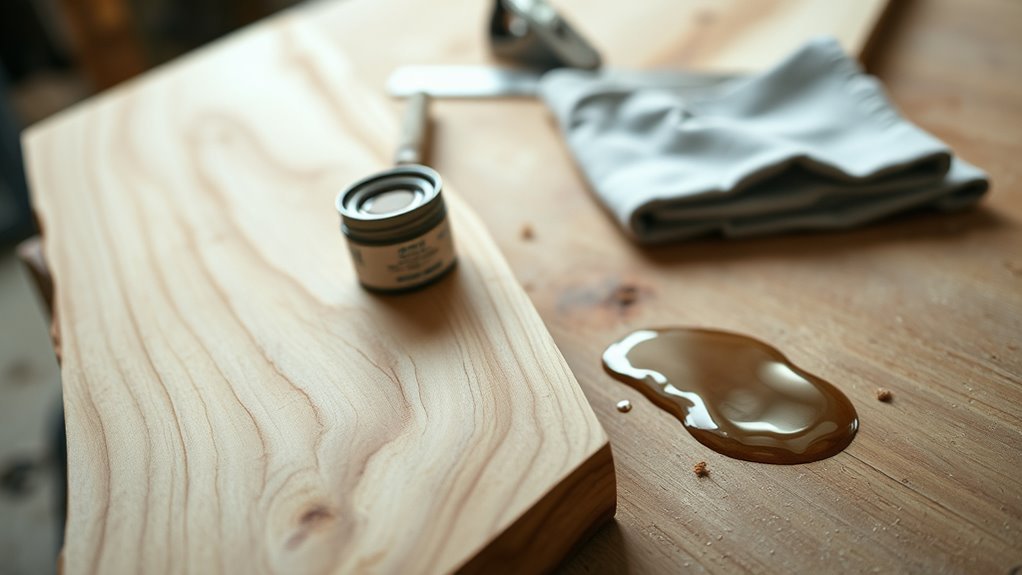
Applying Penetrating Oil: Step-by-Step
Before you start, make sure the wood is clean, dry, and sanded so the oil can penetrate evenly.
Apply the oil with steady, overlapping strokes and wipe off excess to avoid sticky buildup.
Check and reapply as needed over time to maintain protection and appearance.
Surface Preparation
When the wood is clean, dry, and sanded smooth, you’re ready to apply a penetrating oil that will soak into the grain and seal the fibers from moisture. First, remove dust with a tack cloth or vacuum; any residue blocks penetration. Test the oil on a hidden area to confirm color and absorption. Allow the wood to reach room temperature; very cold or damp wood won’t absorb evenly.
- Remove old finishes or contaminants with appropriate solvents.
- Fill cracks and gaps; oils don’t bond like film finishes.
- Mask nearby surfaces to avoid drips and stains.
Application Technique
Now that the surface is prepped, you’re ready to apply the penetrating oil in a controlled, step-by-step way. Pour a small amount onto a cloth or brush, work with the grain, and spread evenly. Let it soak for the manufacturer’s stated time, then wipe off excess. Apply second coat if needed, allow full cure before light use, and always ventilate.
| Step | Action |
|---|---|
| 1 | Pour oil onto cloth/brush |
| 2 | Work with the grain |
| 3 | Let penetrate per label |
| 4 | Wipe off excess |
| 5 | Repeat or cure as directed |
Maintenance Tips
How often should you reapply penetrating oil depends on exposure and wear. Inspect the wood every few months, especially after heavy rain or sun.
Clean surfaces, lightly sand rough spots, and confirm the wood is dry before you start. Apply oil in thin, even coats, wiping off excess after 15–30 minutes. Let each coat cure fully.
- Test a small area first to confirm absorption and appearance.
- Reapply a single maintenance coat annually for sheltered wood, or twice yearly for exposed surfaces.
- Store oil tightly and dispose of rags safely to avoid accidental combustion.
Applying Film-Forming Sealers Without Runs
Ever wondered why film-forming sealers run and drip while you’re trying to get a smooth coat? You’ll avoid runs by working with proper temperature and humidity—apply when it’s cool and dry.
Thin heavy-bodied products per manufacturer directions; don’t overload your brush or roller. Work in thin, even passes, maintaining a wet edge to blend overlaps.
Check for sagging within the recoat window and gently backbrush or roll out drips before they cure. Allow adequate drying time between coats and sand light imperfections.
Clean tools and inspect in good light so final film stays uniform and blemish-free.
Applying Water-Repellent Preservatives Correctly
Curious how to keep wood both water-resistant and decay-free? You’ll prep by cleaning, drying, and sanding to open pores.
Choose a WRPs product labeled for your wood species and exposure.
Apply evenly with a brush, roller, or low-pressure sprayer, working along the grain. Wipe excess within a few minutes to avoid tackiness.
Allow proper drying time before light use.
- Test on scrap to confirm absorption and color.
- Apply when temperature and humidity are within product specs.
- Maintain annual inspections and reapply only when repellency or preservative signs fade.
How Many Coats Each Sealer Type Needs
Because different sealers penetrate and film differently, the number of coats you need varies by product and exposure. For water-repellent preservatives, one coat may suffice for fresh, sheltered trim; two coats give better protection for siding or exposed pieces.
Penetrating oils (linseed, tung) usually need two to three thin coats to saturate fibers; work wet-to-wet for best penetration.
Film-forming finishes—polyurethane, spar varnish, epoxy—typically need two to three coats for a continuous barrier; flexible exterior formulas benefit from three.
Stains with sealer properties often require one to two coats.
Always follow manufacturer guidance and inspect wear to decide reapplication.
Dry Times Between Coats and Full Cure Times
Before you apply another coat, check the manufacturer’s recommended dry time between coats so each layer bonds properly.
Remember that “touch dry” or “tack” means the surface feels dry, but it often needs longer before you can sand or recoat.
Also note full cure can take days to weeks depending on the product and conditions, so plan use accordingly.
Dry Time Between Coats
How long should you wait between coats and before using your finished piece? You’ll follow product instructions: most sealers need 2–24 hours between coats, while oils can require longer. Temperature, humidity, and coat thickness change times.
Light sanding between coats improves adhesion once the surface is dry to the touch but not fully cured. For full waterproof performance, expect a full cure of several days to weeks depending on the finish.
- Check manufacturer dry and recoat windows before applying the next layer.
- Work in moderate temperature and low humidity to speed curing.
- Apply thin, even coats for predictable dry times and better cure.
Touch Dry Vs Tack
When a finish is “touch dry” it feels set to the touch but can still be soft underneath, so don’t assume you can handle or sand it yet. Touch dry means the surface won’t stick to a finger, while tack indicates slight stickiness that can gum up tools or attract dust.
You should wait for a recommended intercoat window—follow manufacturer guidance—to avoid lifting or poor adhesion.
Lightly scuff sanding is safe once the surface resists a gentle fingernail press and tack is gone.
If unsure, test a small area before proceeding with the next coat to ensure proper bonding.
Full Cure Timeframes
Although a finish may feel dry to the touch, full cure takes longer and you should follow the manufacturer’s specified dry times between coats and for final curing. You’ll avoid smudges, adhesion failures, and trapped solvents by waiting the recommended interval.
Temperature, humidity, and coat thickness change cure speed, so adjust your schedule accordingly. Use light sanding between coats when instructed, and don’t rush outdoor exposure.
- Typical recoat window: 2–24 hours depending on product and conditions.
- Handle gently: 24–72 hours for light use on many varnishes.
- Full cure: 7–30 days; check label for exact timing.
Waterproofing a Wood Deck: Step-by-Step
Before you apply any product, give the deck a thorough inspection and clean—remove furniture, sweep debris, and wash away mildew and dirt so the waterproofing can bond properly.
Before treating your deck, inspect, declutter, sweep, and wash away mildew so the waterproofing can bond.
Check for loose boards, protruding nails, and rot; replace or repair as needed. Sand rough spots and allow wood to dry fully.
Choose a penetrating sealer or waterproofing deck coat suited to your wood species and climate.
Apply with a brush, roller, or low-pressure sprayer, following grain direction and manufacturer coverage rates.
Work in manageable sections, maintain a wet edge, and apply a second coat if recommended.
Let cure before foot traffic.
Sealing Exterior Wood Siding and Trim
When sealing exterior siding and trim, you’ll want to start by choosing a durable finish that stands up to sun, rain, and temperature swings.
Prepare the wood by cleaning, sanding rough spots, and repairing gaps or rot so coatings adhere properly.
Apply primers and sealers according to the product instructions for a long-lasting barrier.
Choosing Durable Exterior Finishes
Looking for a finish that actually protects your wood siding and trim? Choose finishes based on exposure, maintenance willingness, and desired look. You’ll want UV resistance, water repellency, and good adhesion to prevent peeling and moisture intrusion. Consider long-lasting options and match sheen to cleaning needs. Test compatibility with existing coatings before committing. Apply according to manufacturer directions and plan for periodic recoat intervals to maintain protection.
- Solid-color exterior stain: blocks UV, masks imperfections, low maintenance
- Semi-transparent stain: shows grain, moderate protection, needs more frequent recoats
- 100% acrylic latex paint: durable, excellent water resistance, easy to touch up
Preparing Siding And Trim
Because properly sealed joints and clean surfaces keep moisture out and finishes lasting longer, you should start prep by inspecting, repairing, and cleaning every siding board and trim piece.
Remove loose paint, rot, and mildew with a scraper and stiff brush, then wash surfaces with a mild detergent or deck cleaner.
Replace any damaged boards and tighten or reset nails to eliminate gaps.
Sand rough spots and wipe away dust.
Prime bare wood and joints with a quality exterior primer.
Back-prime cut ends.
Apply caulk to seams and flashing interfaces, ensuring smooth, continuous seals before you topcoat.
Protecting Outdoor Furniture From Rain and Sun
Want your patio set to last through sun, rain, and changing seasons? Treating outdoor furniture starts with cleaning, sanding, and drying so sealers adhere.
Choose finishes rated for exterior use—UV-blocking varnish, marine-grade spar urethane, or penetrating oil with water repellents.
Pick exterior-rated finishes—UV-blocking varnish, marine spar urethane, or penetrating oil with water repellents for lasting protection.
Recoat annually or after heavy weather; inspect joints and fasteners.
Store cushions and delicate pieces during prolonged wet spells.
Elevate legs off soil and use breathable covers that vent moisture rather than trap it.
- Clean and sand before finishing
- Use UV-resistant, exterior-grade sealers
- Recoat and inspect annually
Waterproofing Wooden Fences Quickly
If your fence needs a fast, effective barrier against rain and sun, start by removing dirt, mildew, and loose paint so the waterproofing soaks in evenly.
Next, dry the wood thoroughly and sand rough spots for better adhesion.
Choose a penetrating water repellent or exterior-grade stain with waterproofing properties and apply with a brush or pump sprayer, working board by board.
Pay special attention to end grains and post tops.
Allow proper drying between coats, and recoat every couple of years or after heavy weather.
Inspect annually for wear, touching up exposed areas promptly to prevent rot.
Sealing Pergolas, Gazebos, and Yard Structures
After waterproofing a fence, you’ll want to apply similar care to pergolas, gazebos, and other yard structures to keep them looking good and standing strong.
Inspect for rot, loose fasteners, and gaps; replace damaged boards and tighten hardware before sealing.
Choose a UV-resistant, exterior-grade sealer or stain formulated for dense outdoor timber.
Clean surfaces with a mild detergent and allow full drying.
Apply with a brush or sprayer, following grain, and work in thin coats for even penetration.
Recoat every few years or after storms.
Maintain drainage and trim nearby plants to reduce moisture contact.
- Inspect and repair first
- Use UV-resistant sealer
- Recoat periodically
Waterproofing Interior Wood Floors and Stairs
Before you apply any finish, you’ll want to clean, sand, and repair the floor or stair surfaces so coatings bond properly.
Choose a protective finish—waterproofing sealers, oil-based varnishes, or polyurethane—and match it to traffic levels and appearance goals.
I’ll walk you through the best prep steps and finish options for long-lasting indoor protection.
Surface Preparation Steps
Preparing a clean, dry, and stable surface is the single most important step when waterproofing interior wood floors and stairs, so you’ll want to tackle debris, existing finishes, and moisture sources first.
Clear loose dirt and vacuum crevices; sand glossy or flaking finishes to promote adhesion; and inspect for rot, warping, or leaks that need repair.
Check subfloor moisture with a meter and fix humidity or plumbing issues before proceeding.
Remove nails or staples and fill gaps with compatible wood filler.
Prime bare wood where recommended to seal grain and improve bond with subsequent treatments.
- Sweep and vacuum thoroughly
- Sand and degloss finishes
- Repair moisture damage before sealing
Protective Finish Options
When you choose a protective finish for interior wood floors and stairs, think about durability, moisture resistance, appearance, and maintenance needs. Each finish—polyurethane, varnish, penetrating oil, or water-based sealer—offers a different balance of those factors, so pick one that matches the room’s traffic, humidity, and desired look.
You’ll pick oil-based polyurethane for maximum abrasion and water resistance in busy areas, water-based for low odor and quicker dry, varnish where UV and heat matter, and penetrating oils to highlight grain while repelling moisture subtly.
Test on scraps, follow manufacturer’s application and cure times, and maintain with gentle cleaning.
Protecting Wooden Doors and Window Frames
Because doors and window frames face constant movement and weather, you’ll want to give them durable, well-sealed protection that preserves function and appearance.
Because doors and window frames move and face weather, protect them with durable, well-sealed finishes to preserve function and appearance
Inspect joints, sills, and hardware; sand smooth, remove old finish, and fill cracks with flexible exterior caulk so movement won’t break the seal.
Use a high-quality exterior primer, then apply a marine or exterior polyurethane or alkyd paint for abrasion resistance.
Refinish every few years and address chips immediately to prevent water ingress.
- Seal gaps with paintable exterior caulk
- Protect hinges and thresholds with rust-resistant hardware
- Maintain finish with scheduled touch-ups
Treating Wood in High-Humidity Rooms (Bath, Basement)
In bathrooms and basements you’ll want to use moisture-resistant sealers to keep wood from warping and staining. Apply a quality sealer and recoat per the manufacturer’s schedule to maintain the barrier.
Pair that with proper ventilation—exhaust fans, dehumidifiers, or improved airflow—to stop humidity from overwhelming the finish.
Moisture-Resistant Sealers
Want your bathroom or basement wood to survive humidity and occasional splashes? Choose moisture-resistant sealers designed for high-humidity rooms.
You’ll prep by sanding, cleaning, and ensuring wood is dry.
Apply an appropriate sealer: marine varnish for heavy exposure, water-based polyurethane for low-VOC clarity, or penetrating oil with mold inhibitors for natural looks.
Recoat per manufacturer directions and inspect edges and joints regularly.
Sealants protect against swelling, mold, and finish failure without replacing ventilation systems.
- Marine varnish: tough, UV and water-shedding
- Water-based polyurethane: clear, low odor
- Penetrating oil: breathable, mildew-resistant
Proper Ventilation Strategies
Moisture-resistant sealers will help, but they won’t solve chronic humidity on their own—proper ventilation controls the moisture that causes swelling and mold. You should install exhaust fans in bathrooms, run dehumidifiers in basements, and keep vents clear. Aim for 30–50% relative humidity and use monitored controls. Position fans near moisture sources and vent outdoors. Inspect regularly for blocked ducts and replace filters.
| Action | Tip |
|---|---|
| Exhaust fan | Sized to room CFM |
| Dehumidifier | Empty or drain |
| Venting | Outside termination |
| Airflow | Unobstructed paths |
| Monitoring | Humidity sensor |
Waterproofing Wood Exposed to Ground Contact
Why should you treat wood that touches the ground differently than other exterior lumber? Ground contact risks constant moisture, decay fungi, and insect attack, so you need tougher protection and regular inspection.
Choose pressure-treated or naturally rot-resistant species, elevate and drain the site, and apply compatible water repellents labeled for ground contact.
- Use pressure-treated lumber rated for ground contact and follow reuse guidelines.
- Guarantee a gravel or drainage layer beneath to reduce standing water.
- Seal cut ends and fastener holes with a preservative to maintain protection.
Using Wood Stains and Sealers Together Effectively
When you combine stains and sealers correctly, you get both the color and the durable protection your exterior wood needs. Start with a compatible stain (oil or water-based), let it dry fully, then apply a clear sealer recommended for that stain type. Test on scrap wood, follow manufacturer recoat times, and use thin, even coats to avoid peeling. Reapply sealer sooner in high-exposure areas. Prioritize UV-resistant sealers for decks and siding. Keep tools clean and sand lightly between coats if needed.
| Step | Purpose |
|---|---|
| Choose stain | Color + penetration |
| Dry | Ensure adhesion |
| Apply sealer | Waterproofing |
| Test | Verify compatibility |
Maintaining a Waterproof Finish Over Time
Because even the best sealers wear down with sun, foot traffic, and seasonal changes, you should check your wood’s waterproof finish at least once a year and after any severe weather. Inspect for peeling, dull spots, mold, and water beading failure.
Clean gently with a mild detergent, rinse, and let dry fully before treating problem areas. Tighten loose fasteners and replace damaged boards to prevent moisture entry. Apply UV-friendly maintenance products on exposed surfaces as recommended.
- Look for softened wood and raised grain.
- Test small areas with water droplets.
- Keep nearby vegetation trimmed to improve airflow.
Reapplying Sealer Without Stripping Old Finish
If your existing finish is intact and not peeling, you can often refresh protection by reapplying sealer without fully stripping the old coat.
First, clean the surface with a mild detergent or wood cleaner, rinse, and let it dry thoroughly.
Begin by cleaning with a mild detergent or wood cleaner, rinse well, and allow to dry completely.
Lightly scuff glossy areas with fine-grit sandpaper to promote adhesion, then remove dust with a tack cloth.
Choose a compatible sealer—penetrating oil for oils, water-based or spar urethane for film finishes.
Apply thin, even coats per manufacturer directions, allowing full drying between coats.
Test a small inconspicuous area first, and recoat only when the surface accepts finish evenly.
Spotting and Repairing Waterproofing Failures
Noticing a dark stain, soft patch, or peeling finish? You should inspect the area, probe soft spots, and smell for mildew.
Stop water entry first: tighten fittings, redirect runoff, and improve ventilation.
Clean affected wood, dry it thoroughly, then sand away compromised finish until sound wood shows.
Apply wood consolidant for spongy areas, let it cure, and spot-prime before resealing.
Match sealer type to surrounding finish to avoid adhesion problems.
- Remove damaged finish, dry, and sand to solid wood.
- Use consolidant on weak fibers, then sand smooth.
- Feather new sealer into old for a seamless repair.
Eco-Friendly Products for Waterproofing Wood
Once you’ve stopped leaks and repaired damaged areas, consider the materials you’ll use going forward — eco-friendly sealers protect wood without harming people or the environment.
Once leaks are fixed, choose eco-friendly sealers to protect wood without harming people or the planet.
You can choose water-based polyurethane, low-VOC penetrating oils, or plant-derived sealants like tung or linseed oil to repel moisture while letting wood breathe.
Look for third-party certifications and read labels for VOC limits.
Apply thin, even coats and reapply per manufacturer guidance.
For outdoor projects, pick UV-stable formulations.
Proper disposal and minimal overspray reduce environmental impact.
Preventing and Treating Mold and Mildew on Wood
Watch for early signs of mold like dark spots, musty smells, or discoloration so you can act fast.
Use gentle, safe cleaners—diluted detergent, vinegar solutions, or a commercial mildew remover—and test a hidden spot first.
Keep wood dry with proper sealing, ventilation, and prompt leak repair to prevent regrowth.
Identify Mold Early
How quickly you spot mold on wood can mean the difference between a minor cleanup and costly repairs. You should inspect damp-prone areas often, checking for discoloration, fuzzy growth, or musty smells. Early detection lets you isolate affected pieces, reduce spread, and plan appropriate treatments without damaging sound wood.
- Look under sinks, near windows, and in basements where moisture collects.
- Watch for color changes (black, green, gray) and texture shifts from smooth to fuzzy.
- Note recurring damp spots after weather events or leaks so you can address humidity sources promptly.
Safe Cleaning Methods
Wondering how to clean mold safely without harming the wood? Start by wearing gloves, a mask, and eye protection.
Test a small hidden area first.
Use a gentle cleaner: a mixture of mild detergent and water or a diluted vinegar solution (one part white vinegar to four parts water).
Apply with a soft brush, scrub lightly along the grain, and rinse with clean water.
Dry the area thoroughly with towels and allow airflow until fully dry.
For stubborn spots, use a wood-safe mildew remover per label instructions.
Dispose of contaminated rags safely and avoid harsh chemicals that strip finishes.
Preventive Moisture Control
Preventing mold and mildew on wood starts with controlling moisture sources: keep indoor humidity below 50%, fix leaks and roof or flashing issues promptly, and guarantee good ventilation in kitchens, bathrooms, and basements.
You should dry wet wood within 24–48 hours, raise furniture off floors, and use dehumidifiers where needed.
Treat small growths with a diluted bleach or vinegar solution, scrub gently, rinse, and dry fully.
For extensive infestations, call a professional to avoid health risks and structural damage.
Seal and finish wood after remediation to prevent recurrence.
- Dry quickly and thoroughly
- Use dehumidification
- Seal after cleaning
Preventing Insect Damage While Waterproofing
Because untreated moisture attracts wood-boring insects, you should combine waterproofing with targeted measures to keep pests away. Treat wood with insecticidal preservatives or borate solutions before sealing; they penetrate and deter larvae.
Seal cracks, end grains, and joints with caulk or epoxy to block entry points. Elevate exterior wood off soil and ensure drainage so moisture doesn’t linger.
Inspect periodically for frass, exit holes, or soft spots and address issues immediately.
When replacing damaged boards, select naturally resistant species or pressure-treated lumber. Follow label directions for any chemical treatments and wear appropriate PPE during application and cleanup.
Cost to Waterproof Common Wood Projects
Alongside pest prevention, budget planning matters: waterproofing costs vary widely by project size, wood type, and method. You’ll estimate materials, tools, and labor; small DIY tasks run cheap, while large decks or siding need more.
Alongside pest prevention, plan your budget—waterproofing costs vary by project size, wood type, and chosen method.
Choose sealers, oils, or membranes based on exposure and lifespan expectations, and factor in prep like sanding or repairs.
- Small projects (picture frames, outdoor furniture): expect $10–$60 for DIY supplies and one afternoon.
- Medium projects (fences, doors): budget $50–$300 including primer, sealer, and basic tools.
- Large projects (decks, siding): allow $300–$2,000+ or higher with professional installation.
How to Read Product Labels and Specs
When you’re choosing a waterproofing product, start by scanning the label for coverage, drying time, and recommended application methods so you can match the product to your wood type and project scale.
Check VOC levels and safety warnings to guarantee proper ventilation and compliance.
Note substrate compatibility—some sealers suit hardwood, others pressure-treated lumber.
Look for UV and mildew resistance if outdoors.
Verify recommended coats, wait times between coats, and recoat intervals.
Review lifespan or warranty claims to gauge durability.
Finally, confirm cleanup requirements and whether brushes, rollers, or sprayers are advised for best results.
When to Hire a Pro Vs. DIY for Waterproofing
After you’ve compared labels and matched a product to your wood and project scale, decide whether you’ll tackle the job yourself or call a pro. You can DIY small, accessible tasks if you’re comfortable sanding, applying finish evenly, and following safety instructions.
Hire a pro when access is risky, coatings require spray equipment, or warranties demand certified installers. Consider time, tool costs, and finish quality you want. Evaluate weather control needs and complex substrates.
- DIY: saves money on simple decks or furniture.
- Pro: better for large exterior projects or tricky joinery.
- Hybrid: you prep, pro sprays for a flawless coat.
Testing Finished Wood for Water Resistance
Because a finish only protects as well as it’s been applied, you should test finished wood for water resistance before putting it into service.
Start by wiping the surface, then place a few small water droplets in inconspicuous spots. Time how long beads persist and note any darkening or absorption.
For larger checks, tape a plastic cup rim to the surface, pour a little water, leave an hour, then inspect for penetration.
Repeat after curing time and after light abrasion.
If water soaks in quickly or finish fails at edges, recoat, sand problem areas, or consult product instructions before using the piece.
Extending Wood Life in Coastal or Salt-Air Areas
In coastal or salt-air areas you’ll want to pick marine-grade sealers that resist salt, sun, and moisture.
Use corrosion-resistant fasteners like stainless steel or coated screws to prevent staining and structural failure.
Also design for ventilation and drainage so water can’t sit against the wood and accelerate decay.
Select Marine-Grade Sealers
One key choice for wood in coastal or salt-air areas is picking a marine-grade sealer designed to resist salt, UV, and constant moisture. You’ll want a product formulated for repeated wet-dry cycles and sunlight exposure; test on scrap wood first.
Apply in thin, even coats, sanding lightly between layers for adhesion. Recoat on schedule—don’t wait until performance drops.
- Choose polyurethane or spar varnish rated for marine use.
- Look for UV inhibitors and salt-spray resistance on the label.
- Follow manufacturer directions for temperature, humidity, and recoat intervals.
Use Corrosion-Resistant Fasteners
When you’re building or repairing wood near the coast, pick fasteners that can stand up to salt air and constant moisture—stainless steel (316 grade) or hot-dipped galvanized are typical choices—so screws and nails don’t corrode, stain the wood, or loosen over time. You should match fastener type to wood and exposure: stainless resists corrosion best; hot-dipped is cost-effective; silicon bronze suits marine hardwoods. Coat exposed heads with compatible sealant and avoid mixed metals to prevent galvanic corrosion. Install fasteners straight and flush to maintain sealers’ effectiveness.
| Fastener | Best use |
|---|---|
| 316 SS | High exposure |
| Galvanized | Moderate exposure |
| Bronze | Teak/hardwood |
| Coated | Budget-friendly |
Promote Ventilation And Drainage
Because salt and moisture sit and worsen rot if they can’t escape, make sure your wood assemblies encourage airflow and water runoff so surfaces dry quickly and stay sound. You should plan gaps, slopes, and clearances that shed water and prevent trapped humidity. Install flashing, weep holes, and ventilated rainscreens where possible, and keep trim off foundations.
Regularly inspect and clear debris that blocks airflow or drainage. In coastal or salt-air areas, thoughtful detailing reduces corrosion and decay and extends service life.
- Provide continuous vents or gaps behind cladding
- Slope surfaces and add drip edges
- Keep soil and mulch away from wood
Winterizing Waterproofed Wood
Got cold weather coming—are your waterproofed wood surfaces really ready for winter? You’ll inspect seals, clear debris, and touch up coatings where wear shows. Check joints and fasteners, tighten or replace as needed. Elevate items off frozen ground and make sure runoff paths stay open.
| Task | Why it matters |
|---|---|
| Inspect seals | Prevent moisture intrusion during freeze-thaw |
| Clear drains | Avoid ice dams and standing water |
| Touch up coating | Maintain continuous barrier |
| Elevate/ventilate | Reduce trapped moisture and rot |
Do seasonal maintenance before first freeze and recheck after storms to keep wood protected and lasting through winter.
Common Waterproofing Mistakes to Avoid
You’ve prepped your wood for winter, but a few common mistakes can still undo that work fast. Don’t assume any product fits every surface; mismatched sealers can fail. Avoid applying finish to wet or dirty wood—sealers won’t bond properly. Skipping thin, multiple coats for a single thick one reduces durability. Also, don’t ignore edge and end-grain protection; water finds gaps.
- Using incompatible products together, causing peeling or soft spots
- Applying sealant in extreme temperatures or on damp wood, preventing cure
- Neglecting fastener heads and joints, creating hidden seepage
Catch these errors early to keep wood protected.
Quick Checklist: Choose, Prep, Apply, Maintain
When you’re ready to waterproof wood, follow a clear checklist. Choose the right product for location and wood type—sealant, oil, or varnish—and confirm UV/salt resistance if outdoors.
Prep thoroughly: clean, sand smooth, remove old finish, and dry fully.
Apply in suitable weather, follow manufacturer instructions for brush/roller technique, and use thin, even coats.
Allow proper dry and recoat times; ventilate when using solvent-based products.
Maintain routinely: inspect annually, touch up scratches, and reapply full coats when water no longer beads.
Store leftovers properly and dispose of rags safely to prevent immediate combustion.
FAQ Mashup: Fast Answers to Top Reader Questions
Now that you’ve got the checklist down, let’s answer the most common questions readers ask about waterproofing wood. You’ll get quick, practical answers so you can act confidently. Use the right product, prep properly, and maintain finishes.
- Which finish lasts longest? Use exterior-grade spar urethane or penetrating oil with UV blockers.
- Can you waterproof painted wood? Yes—prime, paint with exterior paint, then topcoat with clear sealer for added resistance.
- How often to reapply? Inspect annually; recoat every 1–3 years depending on exposure and wear.
Follow those simple checks and you’ll keep wood protected longer.
Frequently Asked Questions
Can Waterproofing Change Wood’s Color or Sheen Permanently?
Yes — waterproofing can permanently alter wood’s color and sheen. You’ll notice darkening, enrichment, or a glossy, satin, or matte finish depending on the product; test first, and expect some irreversible change to appearance.
Will Waterproofing Affect Wood’s Fire Resistance?
Waterproofing can slightly change fire resistance, but it won’t make wood substantially fireproof. You’ll usually reduce moisture—slightly improving ignition resistance—but many waterproof coatings are flammable, so rely on proper fire-retardant treatments.
Can You Waterproof Wood That’s Already Painted Glossy?
Yes — you can waterproof glossy painted wood, but you’ll need to sand or scuff the surface, clean it well, then apply a compatible sealer or waterproofing product. Test a small area first to guarantee proper adhesion and finish.
Are There Food-Safe Sealers for Wooden Cutting Boards?
Yes — you can use food-safe sealers like mineral oil, food-grade tung oil, or beeswax blends; you’ll need to reapply periodically, rub them in thoroughly, and avoid vegetable oils that can go rancid and ruin the board.
How Do Waterproofing Products Impact Indoor Air Quality?
They can worsen indoor air quality by off-gassing VOCs and odors; you’ll inhale irritants and smog precursors, especially during application. Choose low-VOC or water-based products, ventilate well, and let treated wood cure fully.
Conclusion
You’ve got the basics: pick the right sealer for your wood and climate, prep surfaces thoroughly, apply correctly, and keep up regular maintenance. Watch for signs like swelling, stains, or persistent dampness, and choose oil-based for penetration or film-formers for surface protection. Don’t skip sanding or follow-up coats, and winterize before cold hits. With consistent care and the right product, your wood’ll resist moisture and last much longer—inspect it yearly.
